There are great many resources on vSphere Auto Deploy you can find on the Web. Artur wrote about it more than a year ago, I can also recommend step-by-step tutorial on Wojciech’s blog.
In this post I would like to share my experience about two topics that are in fact fine-tuning of your Auto Deploy and make the whole deployment process almost completely “hands-off” (that’s a good thing!).
1. First – bulk licensing for Auto Deploy.
By default auto-deployed vSphere hosts receive a 60-day evaluation license (so, no license at all in fact 😉 ) and you need to assign them with your target (volume) license manually (via Web or vSphere Client).
Fortunately it is really easy to associate your license key with a “host container” (like vSphere datacenter, host cluster or folder – if you happen to group your datacenters/clusters/hosts in folders).
You need to use UpdateAssociatedLicenseData() method of LicenseDataManager object to create this association between “host container” of your choice and LicenseData object that contains proper LicenseKeyEntry.
For my home lab datacenter (SeBa-Lab) the PowerCLI sequence of commands looks like this:
PowerCLI D:\Tools\Scripts> $licenseDataManager = Get-LicenseDataManager

PowerCLI D:\Tools\Scripts> $DataCenter = Get-Datacenter -Name SeBa-Lab

PowerCLI D:\Tools\Scripts> $licenseData = New-Object VMware.VimAutomation.License.Types.LicenseData
PowerCLI D:\Tools\Scripts> $licenseKeyEntry = New-Object Vmware.VimAutomation.License.Types.LicenseKeyEntry
PowerCLI D:\Tools\Scripts> $licenseKeyEntry.TypeId = "vmware-vsphere”
PowerCLI D:\Tools\Scripts> $licenseKeyEntry.LicenseKey = "12345-FGHIJ-67890-PQRST-54321"
PowerCLI D:\Tools\Scripts> $licenseData.LicenseKeys += $licenseKeyEntry

PowerCLI D:\Tools\Scripts> $licenseDataManager.UpdateAssociatedLicenseData($DataCenter.Uid, $licenseData)
You need to be connected to your vCenter as pre-requisite and the license key is of course obfuscated ;).
Nothing really complex here as you can see, yet it gets your hosts licensed automatically. Just remember that if you need to associate your (volume) license key with cluster or folder you need to use appropriate cmdlet first (get-cluster or get-folder respectively). You can of course have different license keys per datacenter/cluster/folder, you can even go as granular as specifying different keys per host (but this idea is against general concept of auto deployment 😉 ). To verify the key association simply execute the query method:
$licenseDataManager.QueryAssociatedLicenseData($DataCenter.Uid).
2. The second topic is a bit more complex and unfortunately a poorly documented one – it’s vSphere Authentication Proxy.
I really like the idea of adding your vSphere hosts to AD domain, but not so much the concept of saving any AD credentials in host profile (even if it is MD5 encrypted there).
vSphere Authentication Proxy is the tool created to help you with that and it helps indeed – provided you are able to get it running ;).
Let’s see the steps I had to follow to make it work (no warranty, expressed or implied is given, that repeating this sequence in your environment will yield you any success 😉 ).
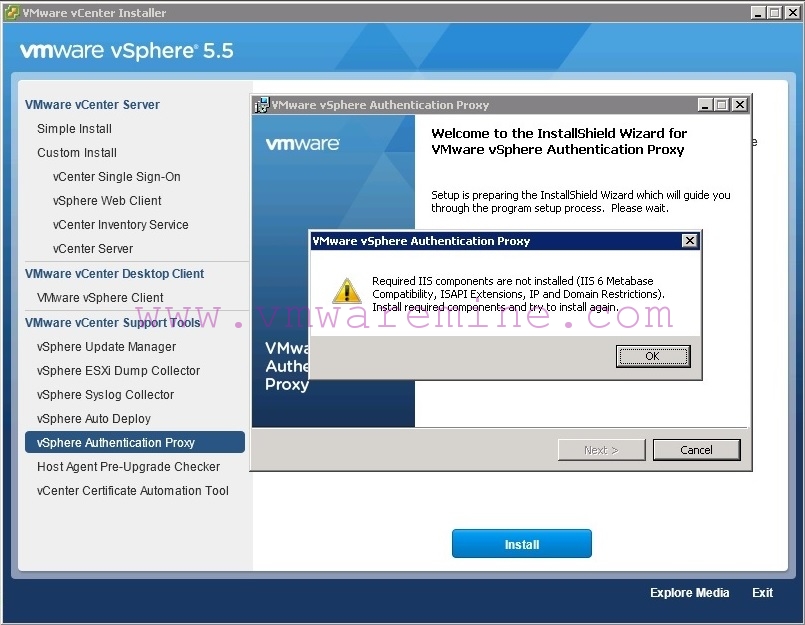
First of all – the system where you install Authentication Proxy needs to be (quite obviously) member of AD domain you want to authenticate against, other prerequisites are Microsoft IIS and Microsoft .NET 3.5 SP1 installed.
That second condition limits your choices a little, as you can’t install Authentication Proxy on your vCenter Server (which I tried) for example, cause you get conflict over TCP 80 (since it is used by vCenter).
What is not listed as a pre-requisite – you will also need some IIS components that are not installed with IIS by default, in the picture below you can see the dependencies I got during my first attempted installation on Windows 2008 SP1. These dependencies will probably vary depending on the Windows version you’re using.
Once you fulfill all the requirements, the installer will ask you for path where to install binaries. Do not use paths that contain “non-ASCII” characters or you will face “Unknown error” as described in this KB.
I my case I installed Authentication Proxy binaries into (not really creative) d:\vmware\auth-proxy\ folder.
Next step looks trivial but it can be really misleading, when installer asks you about vCenter Server address and credentials.
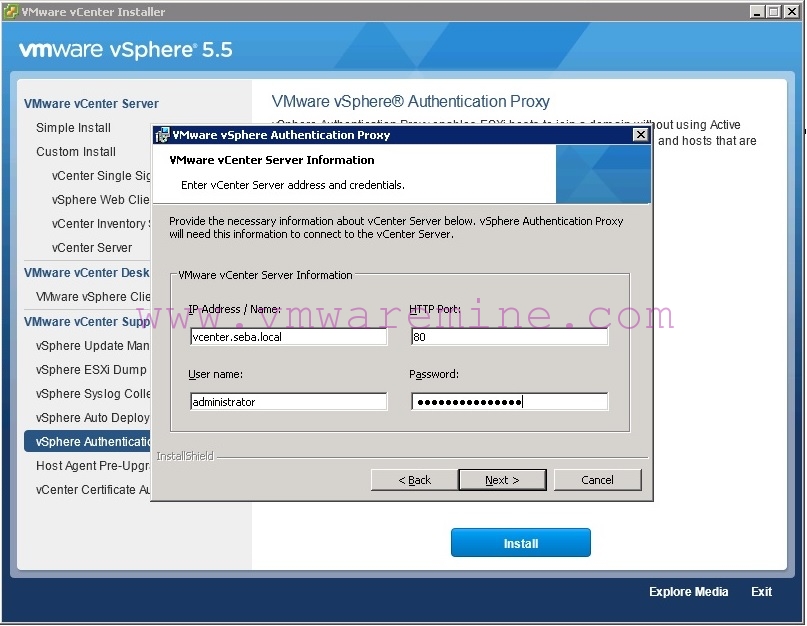
The thing here is that installer needs administrative (or elevated – whatever you call them) privileges in vCenter, on localhost and in your AD.
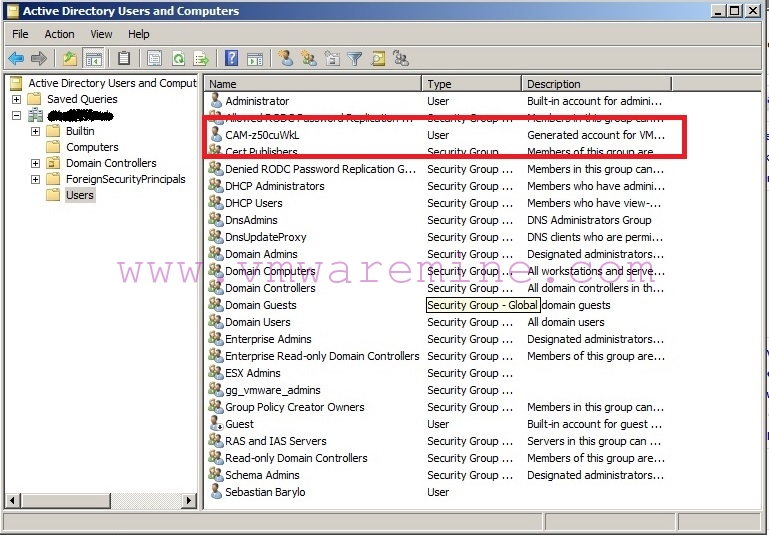
This is because an extension (Authentication Proxy plug-in) needs to be registered in vCenter, a special account for Authentication Proxy (named CAM-<random-8char-string>) is created in Windows domain (this account will ultimately create your vSphere hosts computer accounts in AD) and a “Computer Account Management” website is installed on top of local IIS.
[Update as of August 9th, 2014] Just to elaborate a little on the CAM-* account. Once created it is member of Domain Users group in your AD (which is enough to create computer accounts for vsphere hosts) and vSphere Authentication Proxy service runs with credentials of CAM-* account. No other “elevated” privileges are granted to this account (at least I wasn’t able to discover any 😉 ) [/End of Update]
It is important to remember, that during installation, you need to be logged-on to Windows with account (like Domain Admins group member) that has all Windows-related privileges. The reason for that is the fact, that installer process (which executes Windows part of configuration changes) inherits privileges from your Windows session, while the “Administrator” account you see in above picture is only used for vCenter plug-in registration.
If the account you are logged-on to Windows doesn’t have privilege to create accounts in your AD (for example) – you will end up with “Unknown error” again (been there, done that…).
Next tricky step is specifying “how vSphere Authentication Proxy should be identified on the network“.
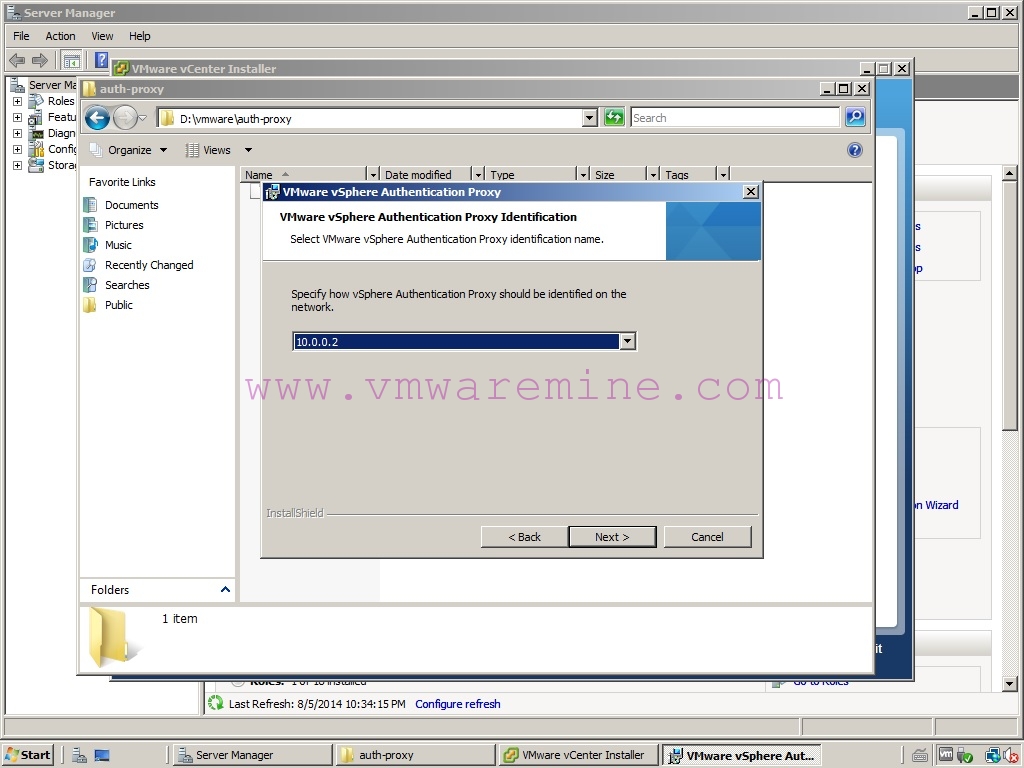
You are offered a drop-down list where you can choose between the FQDN and IP address of your system and it seems that using FQDN would be more elegant, but reality bites again and if you want your proxy to work – you have to select IP address here. This is a bug in installer code, that was discovered by Kenneth in version 5.1 already and apparently it wasn’t fixed (yet?) in version 5.5 (at least at the time of writing this post).
If you reached that far, the installer should complete its tasks w/o any errors, but just to make sure you’re on the right track I’d recommend you to do the 3 following checks.
Check %programdata%\VMware\vSphere Authentication Proxy\logs\camadapter.log logfile, if everything worked fine it should look like this (more or less).
2014-08-05 22:36:15: Logging initialized
2014-08-05 22:36:15: camVCIP: vcenter.seba.local
2014-08-05 22:36:15: camVCPort: 80
2014-08-05 22:36:15: Execute cmd /c appcmd set config "Computer Account Management Web Site/CAM ISAPI" -section:system.webServer/security/ipSecurity /allowUnlisted:false /commit:apphost in path C:\Windows\system32\inetsrv
2014-08-05 22:36:15: Execute cmd /c netsh http delete sslcert ipport=10.0.0.2:51915 in path d:\vmware\auth-proxy\
2014-08-05 22:36:15: Execute cmd /c netsh http add sslcert ipport=10.0.0.2:51915 certhash=6ca7c99cb2ba7e7d763a034b6d066ed78d63a73d appid={44eb5475-158f-45a9-999f-eebfdf02ee29} sslctlidentifier={AEA11446-7D83-46C3-B453-9171F9774383} sslctlstorename=CA clientcertnegotiation=enable in path d:\vmware\auth-proxy\
2014-08-05 22:36:15: Initialize Monitor
2014-08-05 22:36:16: Start Monitor
2014-08-05 22:36:16: Add certificate: host-246
2014-08-05 22:36:16: Certificate is signed by some CA.
2014-08-05 22:36:16: Add certificate: host-33
2014-08-05 22:36:16: Certificate is signed by some CA.
2014-08-05 22:36:16: Add certificate: host-24
2014-08-05 22:36:16: Certificate is signed by some CA.
2014-08-05 22:36:16: Add certificate: host-27
2014-08-05 22:36:16: Certificate is signed by some CA.
2014-08-05 22:36:16: Add certificate: host-31
2014-08-05 22:36:16: Certificate is signed by some CA.
You can see that vSphere host certificates are retrieved to authenticate with proxy as last steps of installation. I’ve got exactly 5 hosts in my lab and all of them use certificates signed by “some CA”, which means “self signed” in this case ;). This is perfectly fine for home lab, but you should think about properly signed certificates for your production environment(s).
Check if CAM-* account has been successfully created in your AD.
Last but not least – check if CAM plug-in is enabled in vCenter.
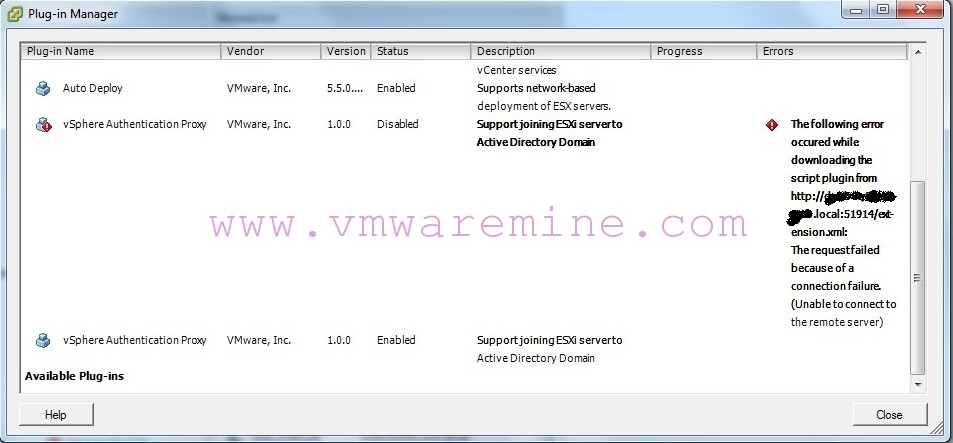
In the picture above you can see that, because TCP 51914 was blocked by Windows Firewall, the plug-in failed to initialize during my first attempt to install Authentication Proxy, so keep in mind that TCP 51914 and 51915 both need to be opened for the proxy to function.
OK – if all three checks are successful the chances are good your Authentication Proxy will work!
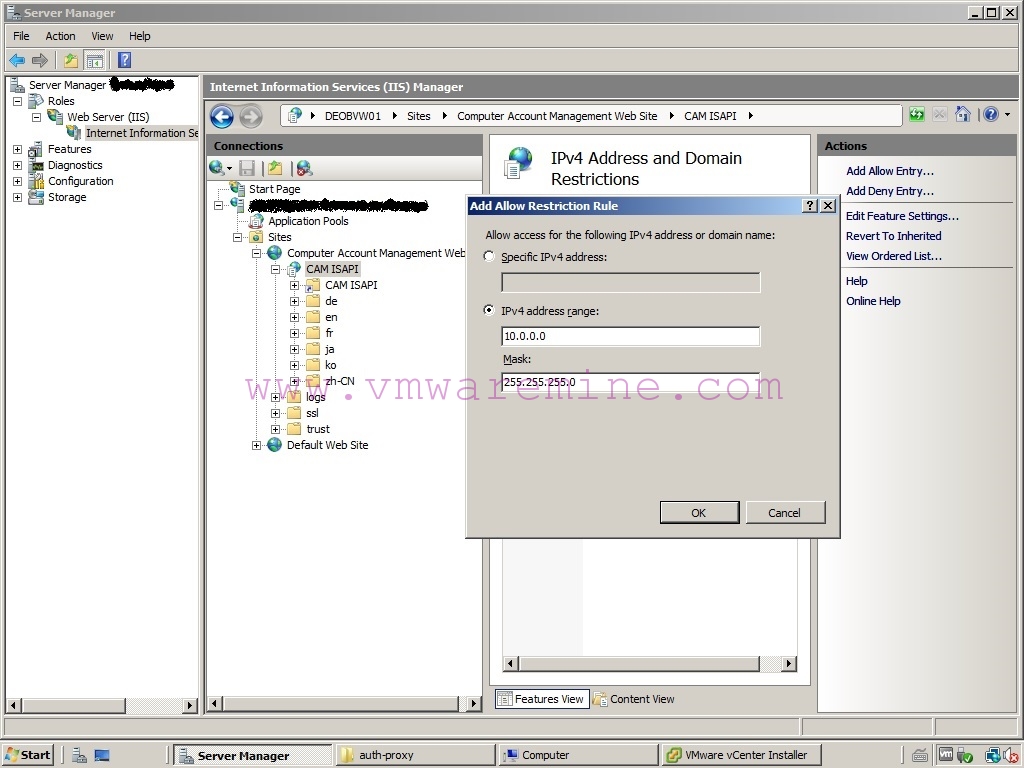
But… you still need to configure your IIS server to accept communication from your vSphere hosts 🙂
Luckily, that’s really simple – you just need to open IIS manager, browse to CAM ISAPI website (must be there! we’ve just installed it, right?) and select IPv4 Address and Domain Restrictions to Add Allow Entry… like in example below.
Aaaand… That’s it! vSphere Authentication Proxy is ready to use!
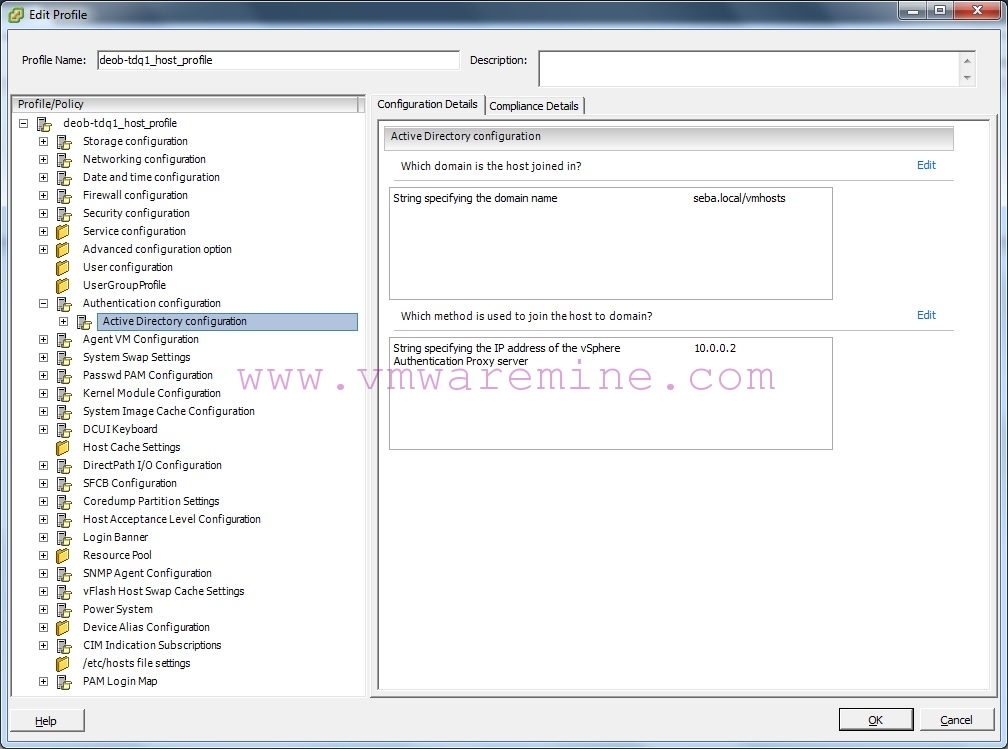
Now, to use it with Auto Deploy it is just as easy as to edit the host profile(s) you are using for deployment. In Authentication configuration sub-profile you need to provide AD domain name and Authentication Proxy IP address. In example below you can see that I’m using vmhosts OU in my lab domain as AD container for vSphere hosts computer accounts. If vmhosts wasn’t a top-level OU the string specified could look like seba.local/level1-OU/level2-OU/vmhosts, or you can just use domain name alone if you want your vSphere hosts computer accounts to be created in default (so Computers) AD container.
And this is how I forced vSphere Authentication Proxy to work hand in hand with Auto Deploy for me, it’s a really nice feature and I think it would be used more often than I see it in use, had it been properly documented.
On the other hand – Auto Deploy is in fact the only real-life use case for Authentication Proxy, in theory you can also use it when adding your hosts to AD manually, but…
As you could see hosts certificates are imported during Authentication Proxy installation. To make this trust relationship mutual the proxy certificate needs to be imported to all hosts under control of given vCenter.
When a host is Auto Deploy-ed this certificate import is done using the same transport mechanism as the host profile is applied, in case you would like to use Authentication Proxy to manually add host to AD, you would need to first import the proxy certificate manually (ever noticed that “Import certificate” link in host’s Authentication services configuration tab of vSphere Client?). Prior to importing it, you’d have to export the certificate from IIS where your Authentication Proxy is hosted and you’d need to export it to a file that is visible by all hosts, so to a shared datastore…
Quite a lot of work to achieve a goal, that can be reached just by providing valid AD credentials in “Directory Services Configuration” dialog 😉
I hope you find this post helpful, feel free to share and provide your feedback!

