For migration from VMware vSphere to Nutanix AHV, please use Nutanix Move (Free V2V tool, developed by Nutanix)
A week ago I posted how to Migrate Windows 2012R2 server from ESXi to AHV in 5 minutes. Today you can see that migrate Suse Linux from VMware ESXi to Nutanix AHV is even easier.
NOTE: Assumptions are:
- vSphere VM VMDK files are already on Nutanix NFS container and networking on ANH is ready.
- you know how to use vi 😉
In my post I will migrate SLES 11SP4 from VMware vSphere 6 to Nutanix Acropolis Hypervisor aka AHV. Most important before you start is to check kernel version. Linux kernel in 2.6.1 and newer has virtIO modules baked in.
sles11sp4:~# uname -r
3.0.101-63-default
sles11sp4:~#grep -i virtio /boot/config-3.0.101-63-default
CONFIG_NET_9P_VIRTIO=m
CONFIG_VIRTIO_BLK=m
CONFIG_SCSI_VIRTIO=m
CONFIG_VIRTIO_NET=m
CONFIG_VIRTIO_CONSOLE=m
CONFIG_HW_RANDOM_VIRTIO=m
CONFIG_VIRTIO=m
# Virtio drivers
CONFIG_VIRTIO_PCI=m
CONFIG_VIRTIO_BALLOON=m
# CONFIG_VIRTIO_MMIO is not set
Next, check if current initrd has virtio modules build in
sles11sp4:~ # zcat /boot/initrd-3.0.101-63-default | cpio -it | grep virtio
37695 blocks
sles11sp4:~ #
If there is no value returned, you have to build new or update current initrd.
Edit kernel config file vi /etc/sysconfig/kernel
sles11sp4:~# vi /etc/sysconfig/kernel
Locate line INITRD_MODULES and insert following modules names between ” “
- virtio
- virtio_net
- virtio_blk
- virtio_pci
- virtio_scsi
Run command mkinitrd to build new mkinit with virtio drivers.
sles11sp4:/ # mkinitrd

Kernel image: /boot/vmlinuz-3.0.101-63-default
Initrd image: /boot/initrd-3.0.101-63-default
Root device: /dev/sda2 (mounted on / as ext3)
Resume device: /dev/sda1
modprobe: Module crct10dif not found.
WARNING: no dependencies for kernel module 'crct10dif' found.
Kernel Modules: hwmon thermal_sys thermal processor fan scsi_mod scsi_transport_spi mptbase mptscsih mptspi libata ata_piix ata_generic vmxnet3 vmw_pvscsi virtio virtio_ring virtio_net virtio_blk virtio_pci virtio_scsi scsi_dh scsi_dh_emc scsi_dh_rdac scsi_dh_hp_sw scsi_dh_alua mbcache jbd ext3 usb-common usbcore ohci-hcd uhci-hcd ehci-hcd xhci-hcd hid usbhid crc-t10dif sd_mod
Features: acpi block usb resume.userspace resume.kernel
Bootsplash: SLES (800x600)
38201 blocks
>>> Network: auto
>>> Calling mkinitrd -k /boot/vmlinuz-3.0.101-63-default -i /tmp/mkdumprd.N0vEeRdOO3 -f 'kdump network' -B -s ''
Regenerating kdump initrd ...

Kernel image: /boot/vmlinuz-3.0.101-63-default
Initrd image: /tmp/mkdumprd.N0vEeRdOO3
Root device: /dev/sda2 (mounted on / as ext3)
Resume device: /dev/sda1
modprobe: Module crct10dif not found.
WARNING: no dependencies for kernel module 'crct10dif' found.
Kernel Modules: hwmon thermal_sys thermal processor fan scsi_mod scsi_transport_spi mptbase mptscsih mptspi libata ata_piix ata_generic vmxnet3 vmw_pvscsi virtio virtio_ring virtio_net virtio_blk virtio_pci virtio_scsi scsi_dh scsi_dh_emc scsi_dh_rdac scsi_dh_hp_sw scsi_dh_alua mbcache jbd ext3 usb-common usbcore ohci-hcd uhci-hcd ehci-hcd xhci-hcd hid usbhid af_packet nls_utf8 crc-t10dif sd_mod
Features: acpi block usb network resume.userspace resume.kernel kdump
51665 blocks
Verify id new modules are appear in newly build initrd
sles11sp4:/ # zcat /boot/initrd-3.0.101-63-default | cpio -it | grep virtio
lib/modules/3.0.101-63-default/kernel/drivers/block/virtio_blk.ko
lib/modules/3.0.101-63-default/kernel/drivers/virtio
lib/modules/3.0.101-63-default/kernel/drivers/virtio/virtio_pci.ko
lib/modules/3.0.101-63-default/kernel/drivers/virtio/virtio_ring.ko
lib/modules/3.0.101-63-default/kernel/drivers/virtio/virtio.ko
lib/modules/3.0.101-63-default/kernel/drivers/net/virtio_net.ko
lib/modules/3.0.101-63-default/kernel/drivers/scsi/virtio_scsi.ko
38201 blocks
Now you are ready to stop VM on VMware vSphere.
Once stopped, switch to Nutanix Prism and create new VM. Add new disk with:
- Operation: clone from NDFS file
- SCSI bus
- as source use VMware vSphere guest -flat vmdk file only.
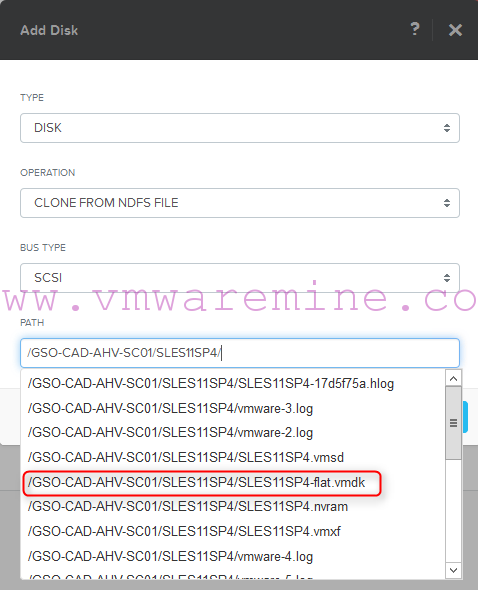
Create VM based on VMware VM disks
Add new network adapter and connect it to right portgroup. Power VM on. Open console and log in to VM using local account. Run yast2 and configure new network with correct IP, you can remove old eth0 adapter. One more action left to complete is to remove VMware tools and remove VMware related modules from kernel config. From /etc/sysconfig/kernel you can remove VMXNET3 and vmw_pvscsi modules. Build new initrd and reboot server.
That’s it. Below video with all steps. Feel free to leave comments or suggestions.


hi actually i use opensuse 10.3 with 2.6.22.5-31-default kernel for my development, and i can’t find any virtio module when i run
grep -i virtio /boot/config-2.6.22.5-31-default
so my assumption is there is no virtio modules on my system, i can’t find any virtio modules available on opensuse, any sugestion for this case
Hi Arthur,
Can you please post instructions on Migrate SLES 11/12 VMs from XenServer to AHV ?
I have followed your procedures of Linux VM from ESXi but for some reason when I search for my virtio, it gives me /boot/config-3.0.101-63-xen and I have tried updating intrid etc. but not working for me.
Please help.