 This is part 2 of a 3-part series on Nutanix disaster recovery capabilities on the VMware vSphere virtualization platform.
In part 1, we covered the basic features of data replication in Nutanix Acropolis Base Software (formerly known as Nutanix Operating System or NOS). We explained what Async DR is and how to set it up. We also explained what Metro Availability is and how to set it up (with a bonus Powershell script to assist with some of the tedious vSphere DRS configuration tasks).
In part 2, we look at how to do planned failovers
and failbacks for Async DR and Metro Availability.
Finally, in part 3, we will look at how to execute unplanned DR with Async DR and Metro Availability, including how to failback once your failed site has been recovered.
First, I want to start by apologizing to readers for the delay between publishing of part 1 and this part 2. Time flies by when you’re at Nutanix and it has been very difficult to find the time to complete this second part. Hopefully, part 3 will shortly follow now that I have the lab up and running again.
So, you’re all configured for disaster, but are your operations ready to handle an event? While it would be nice to be able to predict events, the next best thing is preparing for them the best you can.
DR testing is always a good idea so that you may find how well your solutions works before something really bad happens. Planned testing however is pretty much always slightly different from real disaster. People know it’s coming and they get ready. Everybody you need will be available. Most likely, you won’t actually fail systems, but only move data and workloads from one datacenter to another… Still, it’s good functional testing of your DR solution and sure beats doing nothing and waiting for shit to hit the fan.
Now on to the nitty gritty details of planned failover and failback.
Planned failover and failback for Async DR on VMware vSphere
Failover is a fairly straightforward process:
- Connect to the source cluster Prism interface and navigate to the “Protection Domain” screen.
- Select the “Table” view and the “Async DR” tab.
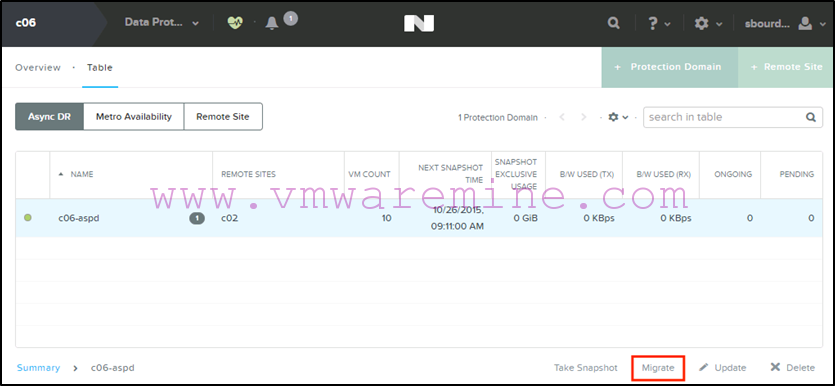
- Select your protection domain, and click “Migrate” in the bottom right corner of the table.
-
What will happen is the following:
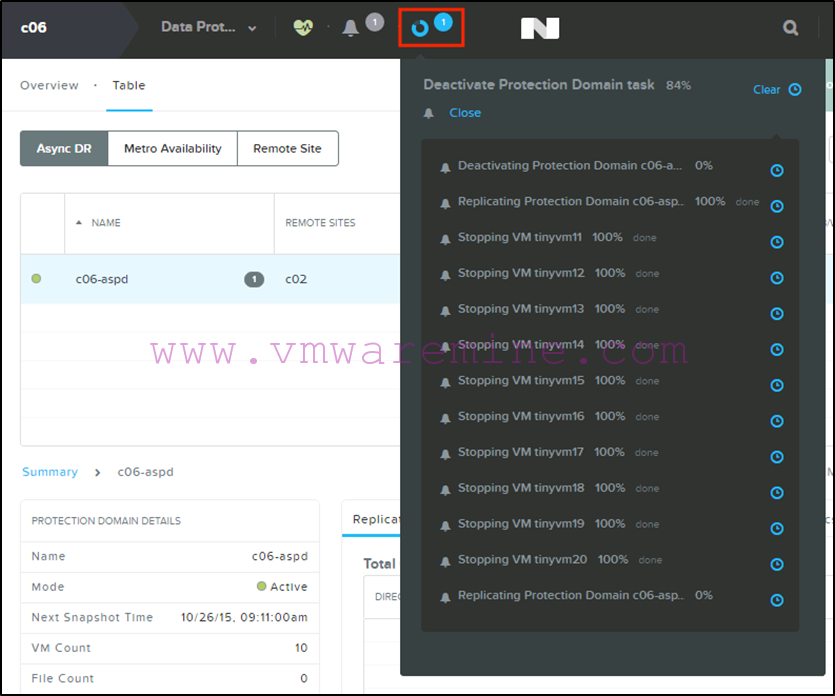
- A snapshot will be taken and replicated to the target site
- VMs will be shutdown and unregistered from their current ESXi host. Because this is done talking to the ESXi host rather than the vCenter server (which is a single point of failure), this leaves orphaned VM objects in the vCenter server inventory. More on that later.
- VMs are registered on a target host (which happens to be the Nutanix Cerebro master at the target site; more on that later).
- If necessary, remap the VM network interfaces to the appropriate port group (more on that later).
- Power on your VMs.
- If necessary, reconfigure the IP address in each VM (more on that later).
- Remove orphaned VMs left in vCenter inventory at the source site.
- That’s it!
Failback is essentially the same process but done starting at the target site rather than at the source (duh!).
Note that:
- When you “migrate” an Async DR PD, you’re just validating that replication works and that your VMs can be powered on on the target site. Because this is done with both sites available, this isn’t the same as testing a site failure.
- MAC addresses do NOT change. VMs are registered using their vmx files on the target ESXi host, so they remain exactly as they were.
-
Because Prism does not talk to vCenter, if you are using a distributed virtual switch, VM network interfaces will not be correctly connected to a valid port on their dvportgroup. This is because vCenter is the unique control pane for dvswitches. That means you will need to:
- Remap each VM network interface to another portgroup manually
- Map them back to their original portgroup (at which stage vCenter will correctly assign a valid port number on the dvswitch portgroup)
- If you have multiple compute clusters at the target site within the same Nutanix cluster, the Cerebro master (against which Prism registers the failed over VMs) may not be a host in the desired compute cluster. You will then have to move the VMs to their intended cluster manually. Note that in mixed hypervisor Nutanix clusters, the Cerebro master may not be a vSphere host, in which case the migration will fail.
- If you are not using VMware Site Recovery Manager, you should at least run VMware Tools in your VMs to enable you to use the invoke-vmscript PowerCLI command to facilitate reconfiguring the VM network interfaces with the correct IP information. An alternative is to use static reservations in your DHCP server (since MAC addresses do not change). See Alan Renouf’s example on how this can be done.
- When you failback, changes done at the target site will be replicated back to the source site. Depending on the version of Acropolis OS you are running, this can be a full or incremental sync.
- If you are using volume groups (iSCSI LUNs directly attached inside the guests) you will need to re-attach those volumes as the volume group UUIDs change when registered at the target site. This is also true for the failback.
-
You can use the following PowerCLI command to re;ove greyed out VMs (orphaned or otherwise, so be careful with this command!) from the vCenter inventory:
Get-VM | where {$_.ExtensionData.Summary.OverallStatus -eq ‘gray’} | remove-vm -Confirm:$false
- If your virtual machines are in resource pools, they are always registered in the default root resource pool, so you will need to move them again to the correct resource pool(s).
-
Make sure that all your Nutanix cluster nodes are properly time synced or failover and failback can fail. You can run the following commands from one of the CVM in each cluster to double check:
allssh date
Refer to Nutanix KB1429 for help with troubleshooting NTP issues.
- If you want to speed up slightly the failover, shutdown your VMs in vCenter first rather than let Prism handle it. This will prevent issues if a VM does not shutdown properly for whatever reason.
- After failing over/migrating an Async DR to a target site, you will need to recreate any replication schedule that existed at the source site if you now want to replicate from target to source until you fail it back.
- If you have not correctly defined the target to source vstore/container mapping in the remote site definition at the target site, the failback will fail.
- You may get false positive MAC address conflicts in vCenter as it can confuse the orphaned VMs and re-registered VMs as distinct entities. You will have to clear manually those alerts.
Now for an example with screenshots in the lab.
For this procedure, our lab setup is the following:
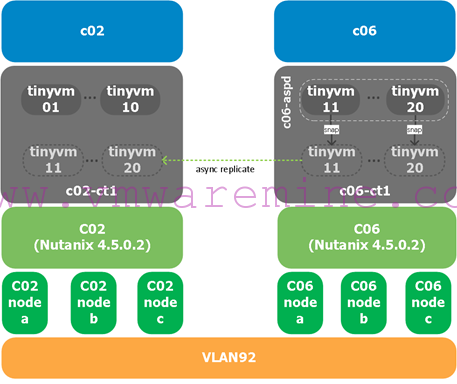
We are replicating VMs from Nutanix and vSphere cluster c06 (our source) which are in container c06-ct1 to Nutanix and vSphere cluster c02 (our target) in container c02-ct1.
- First, we select the Async DR protection domain on c06 and click « Migrate »:
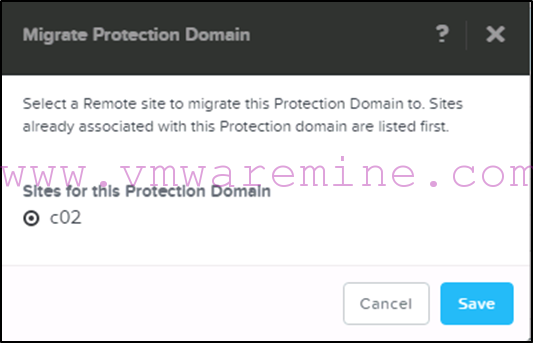
- We select the c02 site as the target that we want to failover to :
- We can monitor the progress of the migration from Prism :
- When the migration is completed we will see the protection domain become active on the c02 Nutanix cluster in Prism :
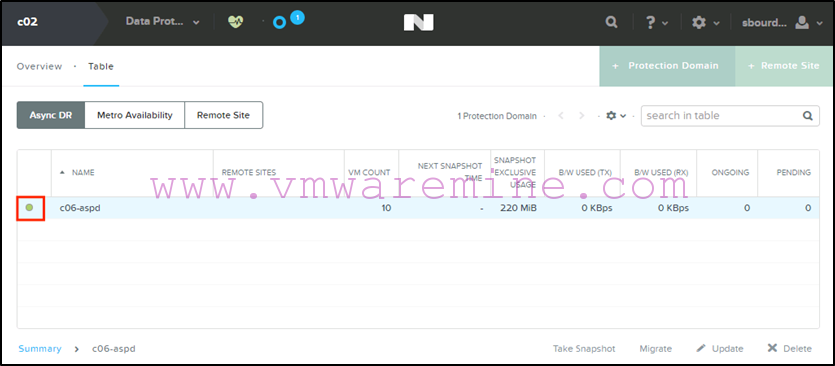
- We will also see oprhaned VM objects in vCenter under the c06 vSphere cluster which we can remove from inventory (see suggested PowerCLI command above to do that):
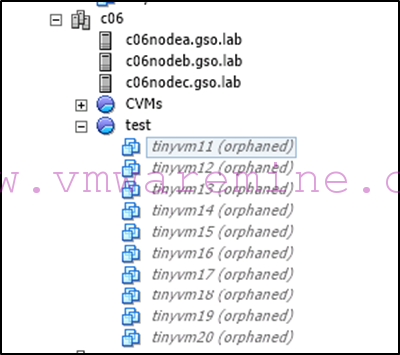
- And the new VM objects registered under the c02 vSphere cluster in the root default resource pool :
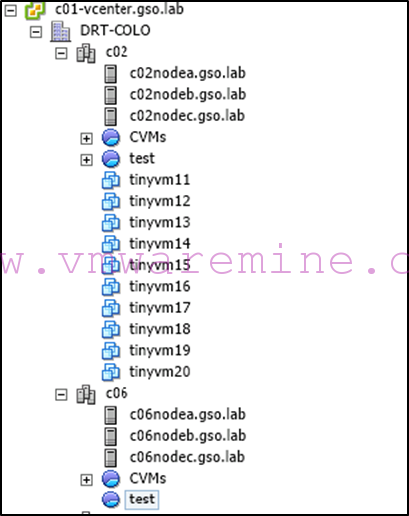
-
If necessary, we can remap our VM network interfaces to different port groups using a PowerCLI command such as :
Get-cluster c02 | get-vm | get-networkadapter | where {$_.NetworkName –eq “dvportgroup-567”} | set-networkadapter –networkname “c02-VLAN92” –Confirm:$false
How do you find out the dvportgroup name? By listing it on one of the VMs you just migrated using:
Get-vm “tiny-vm1” | get-networkadapter | format-table –autosize
The output of those commands is shown in the folllowing screenshot:
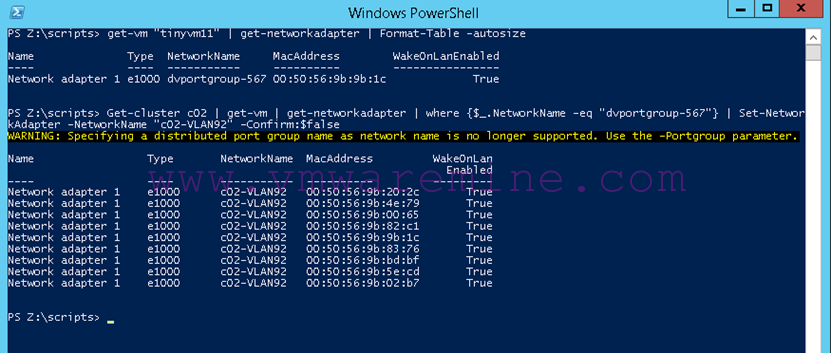
- We can now power on our VMs. If necessary, we will have to reconfigure our VM IP addresses (I use DHCP in my lab).
That’s it.
Failback is the exact same process but from c02 to c06.
Planned failover and failback for Metro Availability on VMware vSphere
Note: Since I started writing this article, AOS 4.6 has been released, which offers major improvements for planned failover with MA. So first we’ll go into the pre 4.6 steps, then I’ll cover the new improved way to failover VMs.
With Acropolis Operating System (AOS) 4.5.x and below:
Planned failover is very straightforward for MA. The workflow is the following:
- You shut down all the VMs which are in the container you want to failover
- You modify your DRS affinity rules to make sure VMs will run on the secondary site hosts
- You disable the replication on the protection domain
- On the Nutanix cluster which has the standby protection domain, you promote that PD and you re-enable replication (if you want to preserve your changes)
- You power on your VMs and verify that everything is working as expected
To failback, the process is the same in reverse:
- You shut down all the VMs which are in the container you want to failback
- You modify your DRS affinity rules to make sure VMs will run on the primary site hosts
- You disable the replication on the protection domain
- On the Nutanix cluster which has the standby protection domain, you promote that PD and you re-enable replication
- You power on your VMs and verify that everything is working as expected
Note that in that process, you do not really test the HA mechanism which would intervene in an unplanned event. To test HA, you would have to simulate a failure, which we will cover in part 3 of this series. The only thing you are testing is that data has been replicated correctly and that VMs can start on the other site.
Now for the screenshots. As a reminder, this is our setup in the lab:
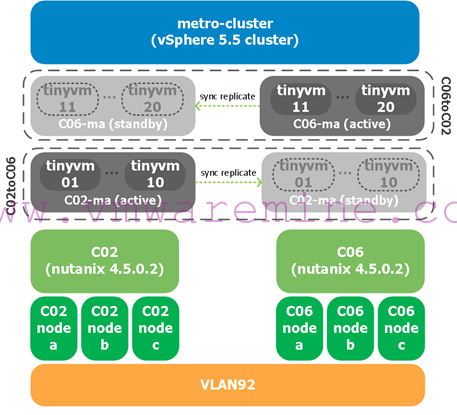
We will failover VMs in the c02-ma from c02 to c06 and back.
Step 1: Shutdown VMs and update DRS affinity rules
First thing we need to do is shutdown VMs. Why? Because we will need to stop replication before we promote the standby protection domain on the secondary site, which means that if VMs are left running, data may change and containers will become de-synchronized.
The best way to make sure you shut down the right VMs is to select the datastore in the vSphere client or web client, and look at the virtual machines which are running on it. Then select all the VMs and power them down.
- In our example, we will failover VMs which are on c02-ma to the c06 hosts, therefore we shut down all VMs which are running on the c02-ma datastore:
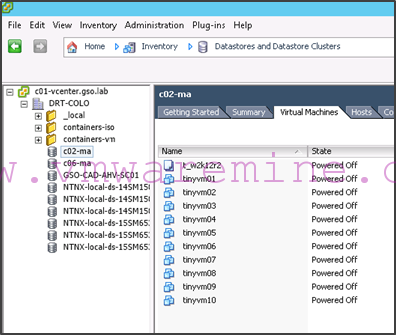
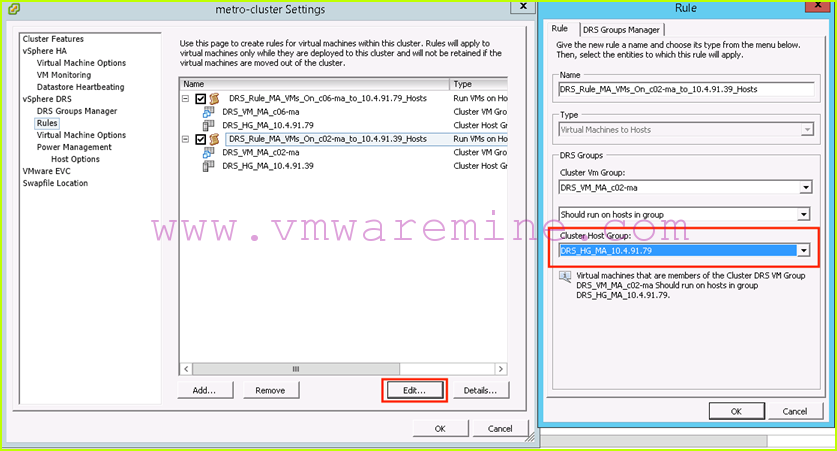
- We then need to update our DRS affinity rules to make sure that DRS will not try to start those VMs on the c02 hosts after failover. In our example, that means we need to update our DRS affinity rule so that c02-ma VMs should run on c06 hosts:
We are now ready to failover the protection domain.
Step 2: Failing over the protection domain and restarting VMs
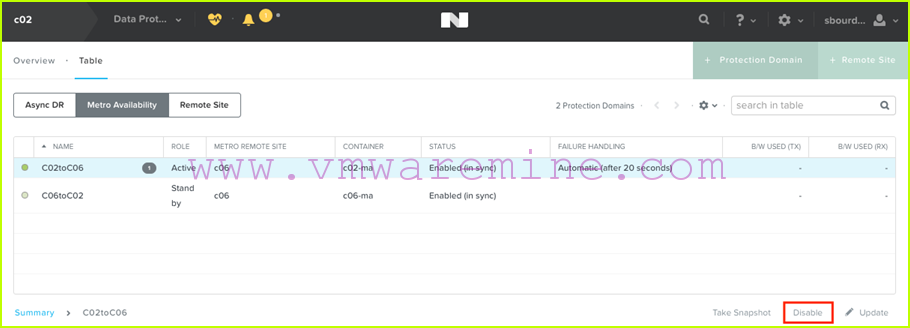
- The first thing to do is to disable the replication on the protection domain. From c02, we select the C02toC06 protection domain and click on “Disable”:
- Next, on c06, we select the standby C02toC06 protection domain, and we click on “Promote”:
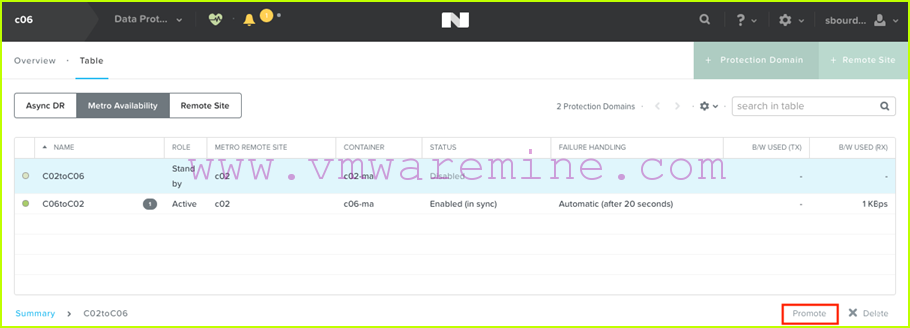
- Now assuming we want to preserve our VM changes during failover testing, we will re-enable replication by selecting the promoted protection domain which is now active and clicking on “Re-enable”:
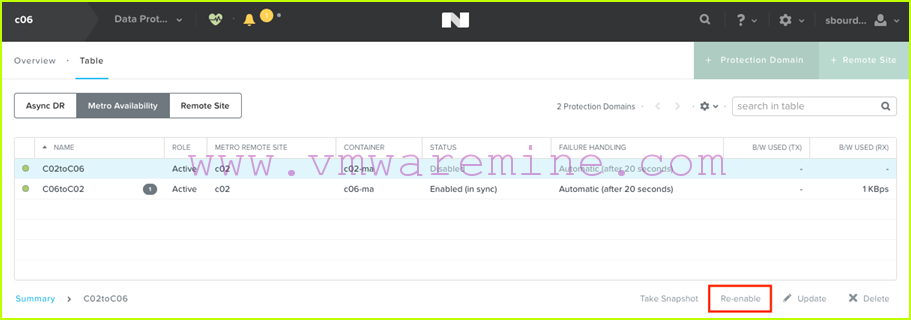
- Prism warns us that data on the c02-ma container on c02 will be overwritten, which is fine since now the active c02-ma container is running on c06 (this is why we shut down VMs in step 1):

- When the replication is done, the C02toC06 protection domain will be in status “Enabled in-sync”:

- We can now restart our VMs on the c02-ma datastore. Because DRS affinity rules have been updated, they will power on on c06 hosts, which is what we want:
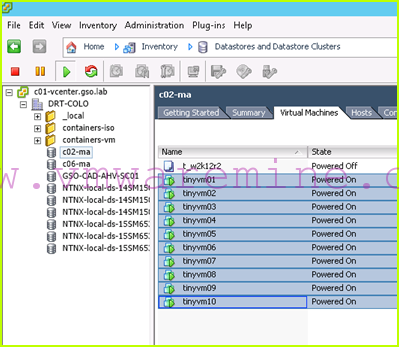
Before we failback, we would want to make sure our applications are running okay.
Step 3: Failing back to the primary site
Failing back is pretty much the same process in reverse order.
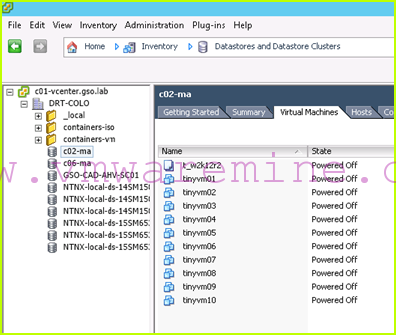
- We start by shutting down VMs which are running on the c02-ma datastore:
- We then update our DRS affinity rules to make sure those VMs will now restart on the c02 hosts:
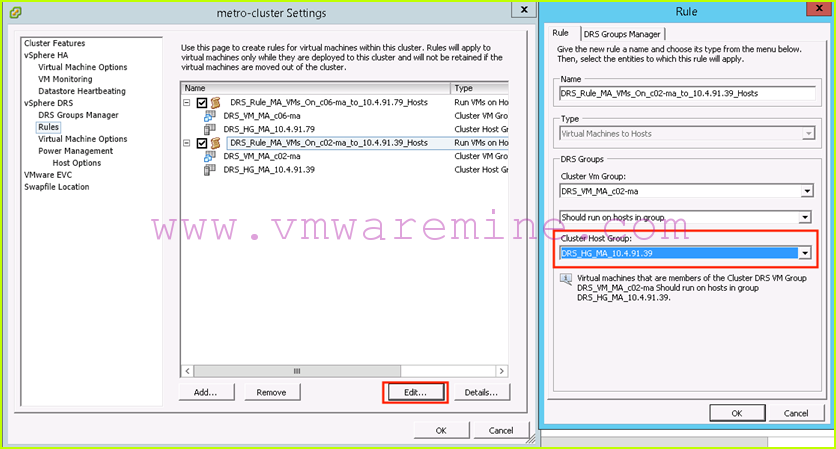
-
We then disable replication on the C02toC06 protection domain from c06:
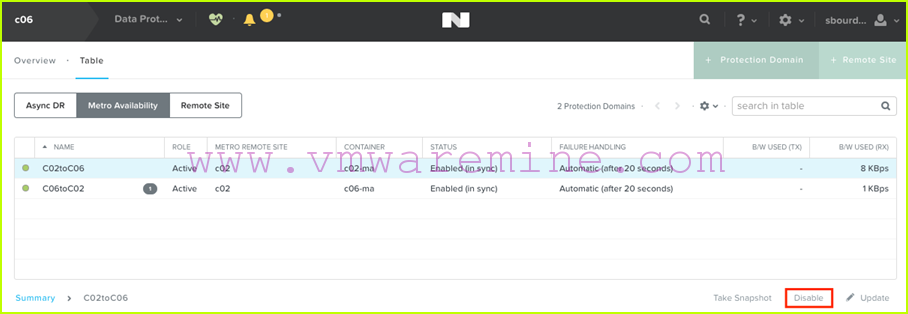
- We then promote the standby protection domain from c02:
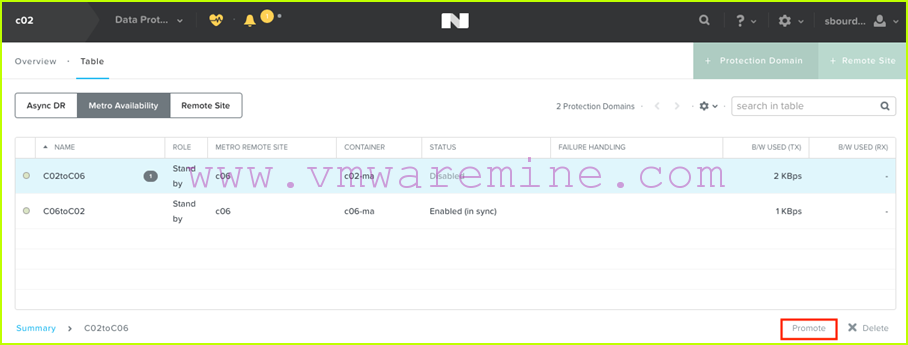
-
We re-enable replication on the now active protection domain from c02:
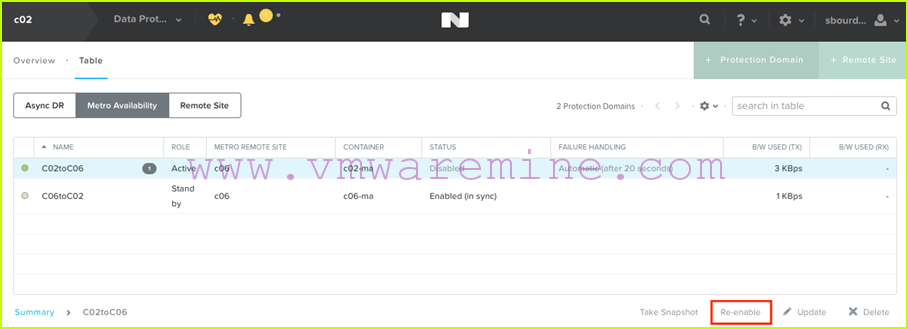
- We then power up our VMs:
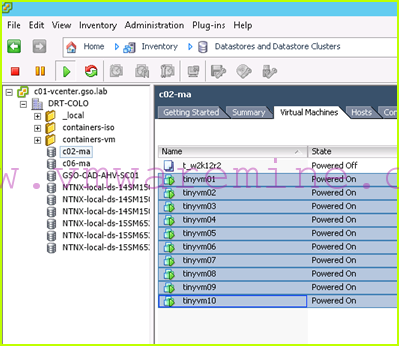
- That’s it! (apart from functional testing of your applications, of course)
With AOS 4.6.x and above
Let’s face it, sometimes downtime on production workloads for testing a high availability and DR solution just doesn’t make sense. This is why AOS 4.6 introduces non-disruptive failovers for Metro Availability Protection Domains on vSphere. This is done by allowing you to promote the standby PD without having to disable replication on the primary.
The steps are documented on our support web site here.
You’ll see that the first suggested step in this process is to disable automated DRS. This is because you need to be able to predict where VMs will be when performing the failover. While this is fine, this is not ideal. If you have 200+ VMs, you may not want to have to distribute them manually when doing the vmotions. For this reason, I will document here alternative steps that will yield the same results while using a more automated approach.
It goes as follows:
- Change your DRS rules so that all VMs on the primary site are now running on hosts in the secondary site. Note that depending on your setup, this may have an impact on the performance of production applications since they will now be running on a remote site. If your secondary site is planned for degraded performance during a DR exercise (but really it should not), then you will run in such a degraded state.
- Verify that all workloads are now running on the secondary site, and promote the PD on the secondary site.
- Disable the PD on the primary site.
- Re-enable the PD on the secondary site.
That’s it for failover. Failback is the same but we invert primary and secondary. Easy as pie.
Now for detailed steps with screenshots.
Because it’s been awhile since I started writing this article, my lab setup is slightly different for this demo. Here it is:
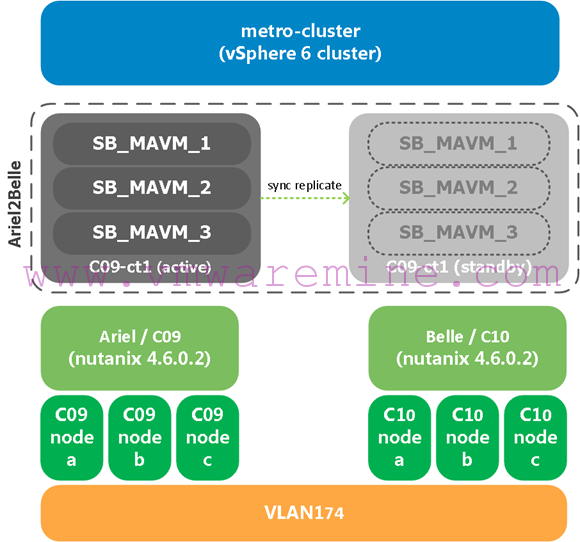
Note that:
- Ariel (C09) is the Nutanix cluster on the primary site. Belle (C10) is the Nutanix cluster on the recovery/secondary site.
- We’re running vSphere 6 and AOS 4.6.0.2. The vSphere version does not matter for this.
- We’re using standard vswitches, but since this is a metro cluster, dvswitches would work just the same.
- I have used my script (available in part 1) to create the proper DRS rules for this setup. So as a starting point, all VMs are running on hosts in the primary Nutanix cluster/site which is Ariel/C09.
Now for the details:
-
We start by updating our DRS rules so that workloads that are currently running on hosts in the primary site are now running on hosts in the secondary site. Assuming my script was used to create DRS rules for MA, this means changing the “DRS_Rule_MA_VMs_On_c09-st1_to_ariel.gso.lab_Hosts” and changing the cluster host group to “DRS_HG_MA_belle.gso.lab”
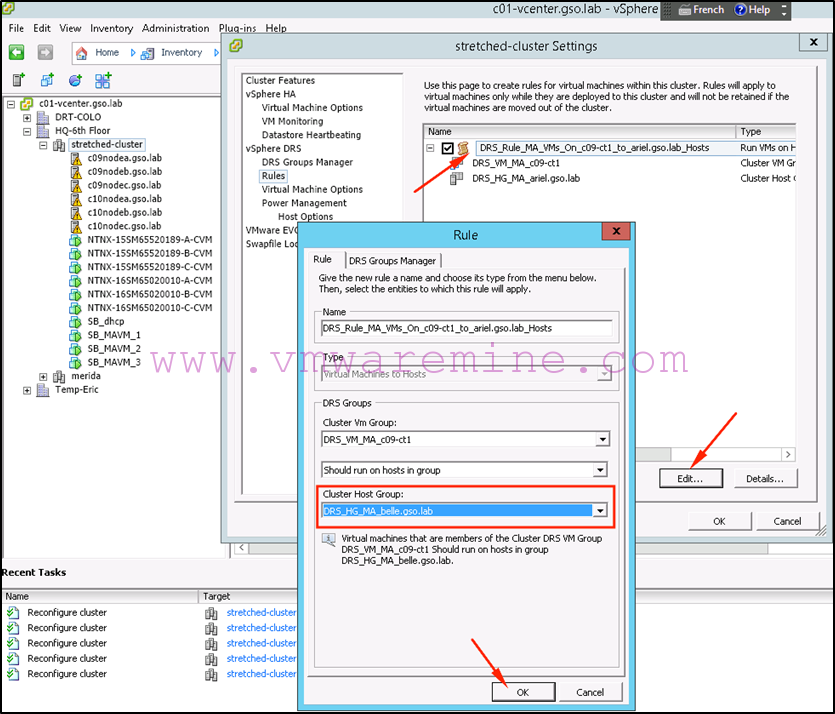
-
If you are impatient like me, you can force DRS to apply this new rule immediately instead of waiting for its next cycle:
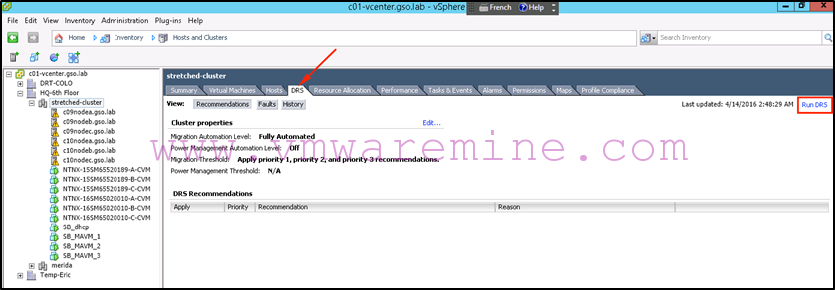
-
Sooner or later, you should see your VMs migrating:

-
We can now double check that all VMs are running on the recovery/secondary site:
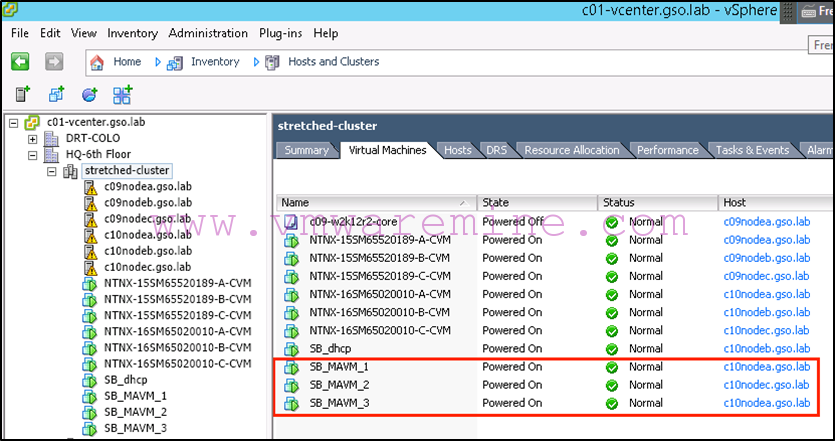
Note that they have been distributed across hosts as deemed appropriate by DRS.
-
Now we are ready to promote the MA Protection Domain on the secondary site:

Note that you will have to confirm this operation by typing PROMOTE:
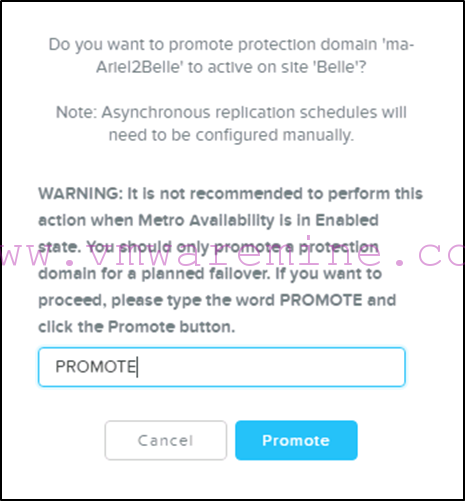
-
At this stage, the PD on the primary site will be in “decoupled” status. Let’s disable it:

The PD will still display as Active on primary, but in the “disabled” status:
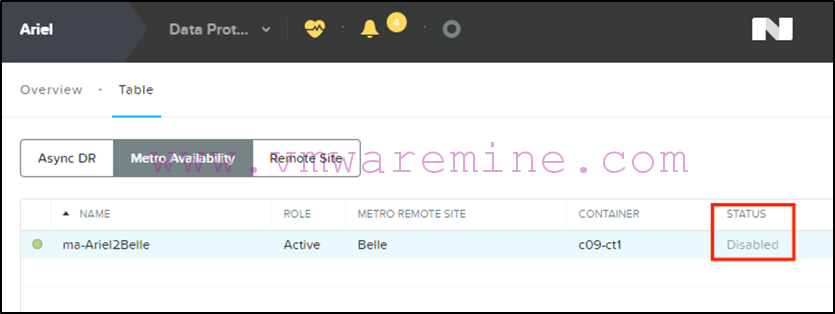
-
We now need to re-enable the PD on the secondary
site, where the VMs are running:
You will be shown the following warning box to make it clear that data on the primary site (ariel) will be overwritten, which is fine since all VMs are running on the secondary site which holds the “correct” copy of the container:
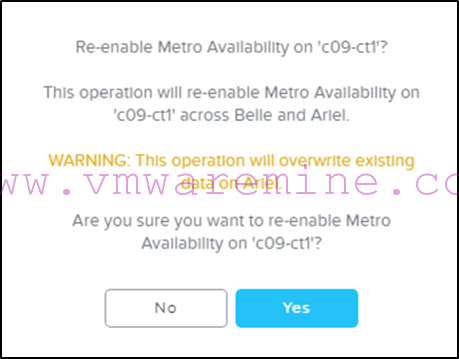
-
So at this stage our PD will show “Active” and “Enabled (in sync)” on the secondary site (Belle):

And “Standby”, “Enabled (in sync)” on the primary site (Ariel), which is the way we want it:
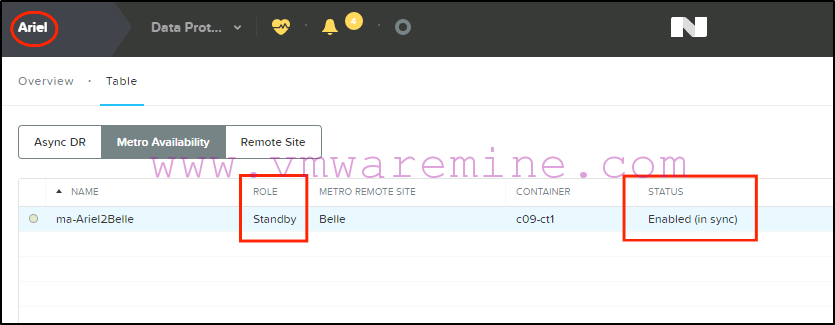
That’s it for the failover. Our VMs are now running on the recovery site and haven’t been affected by any of this. This is seamless from a user experience point of view (assuming your DR site has the same capabilities as your primary site, which it should in a metro cluster configuration).
Now for the failback:
-
We start by changing our DRS rule once again. This means changing the host group to ” DRS_HG_MA_ariel.gso.lab” on the ” DRS_Rule_MA_VMs_On_c09-st1_to_ariel.gso.lab_Hosts ” DRS rule:
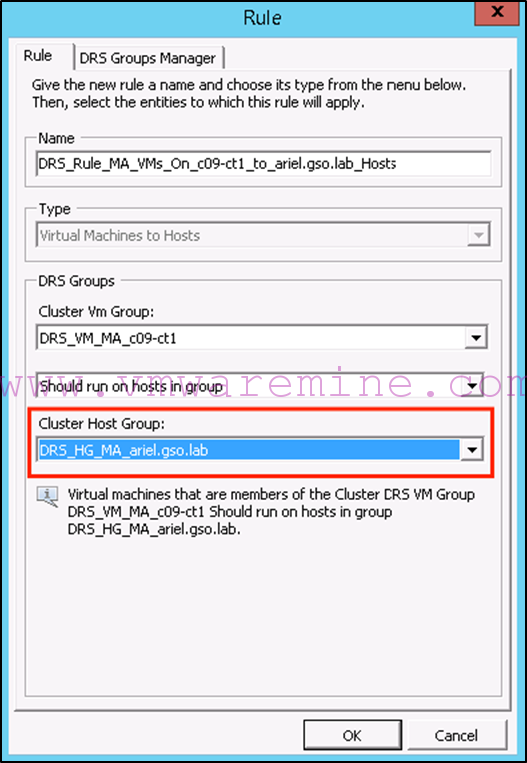
-
After a while, DRS will migrate the VMs and you can double check that they are all running on hosts in the primary site:

-
Now we promote the PD on the primary site:

-
Disable the PD on the secondary site:

-
Re-enable the PD on the primary
site:
- That’s it! Again, this has been seamless for your VMs and their users.
Some caveats (I know…):
- The key is to make sure your VMs are running on the correct hosts. If you start VMs on the hosts which belong to the Nutanix cluster where the PD is still Active after you’ve just promoted the PD on the secondary, you essentially end up with VMs writing in two different containers, and you may lose data.
- Go slow and wait for status to update before moving on to the next step, and you’ll be fine : ) If you don’t trust your clicks, you still have the option to do this the old way and shutdown your VMs to eliminate risks.
Planned failover and failback for Sync DR on VMware vSphere
While similar to a Metro Availability failover, the process for a Sync DR protection domain is slightly different in that it requires additional steps which cannot be automated in Prism.
At a high level, the steps are the following:
- Stop the protected virtual machines at the source site by powering them off.
- Disable replication on the protection domain from the source site.
- Promote the protection domain at the target site.
- Re-enable replication on the protection domain at the target site.
- Remove the VMs from inventory in vCenter.
- Register the VMs in vCenter on the target site cluster.
- If necessary, remap the virtual network interfaces to the desired port group.
- Power your virtual machines on.
- If necessary, modify your virtual machines IP addresses.
Failing back is essentially the same steps but inverting source and target sites.
Now for some screenshots…
First, a diagram of our lab setup for Sync DR:
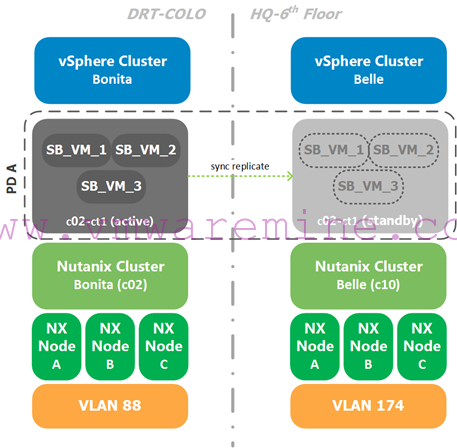
Note that:
- We have two different datacenters: DRT-COLO (the source) and “HQ-6th Floor” (the target).
- We have two different Nutanix and compute clusters labeled Bonita (source) and Belle (target).
- We have different VLANs at the source and target. We use the “VM Network” generic port group name so we don’t have to remap virtual interfaces when failing over or back and we use DHCP in both datacenters to keep the scenario simple.
- Compute clusters are running vSphere 6 update 1 and Nutanix clusters are running AOS 6.0.2.
- Both compute clusters are managed from the same vCenter, which is not included in the DR exercise (the vCenter VM is running in a different cluster).
Now for the detailed steps with screenshots:
-
First we shut down all three VMs from Bonita (the source):
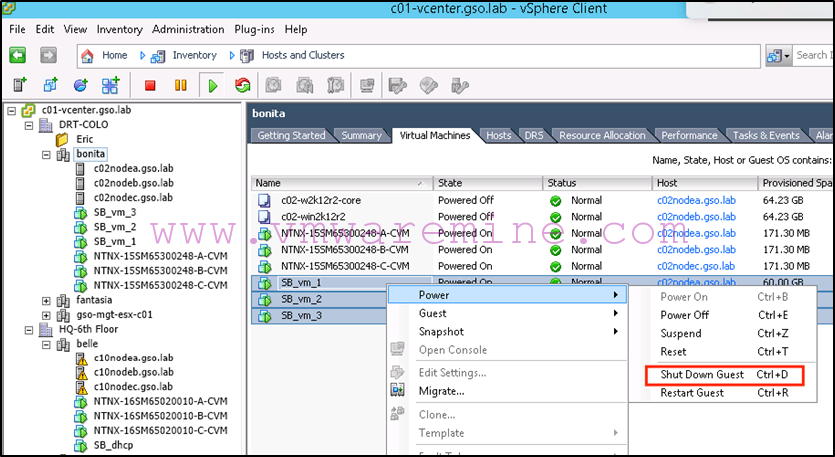
-
Next we disable replication on the protection domain from Bonita (the source):


-
Next we promote the protection domain on Belle (the target). Note that it will warn you about disabling the protection domain on Bonita, which we have already done in step 2 above:

Note that at this stage, the protection domain is showing the role “Active” on Belle:

-
Next we re-enable the protection domain on Belle (the target):

Prism will warn you about overwriting the container on Bonita, which is why we stopped the VMs in the first place (so there would’nt be any change between the disable and the promote/re-enable). Wait for the protection domain to display the “Enabled (in sync)” status:

-
Next we remove the VMs from inventory on Bonita (the source) in vCenter:
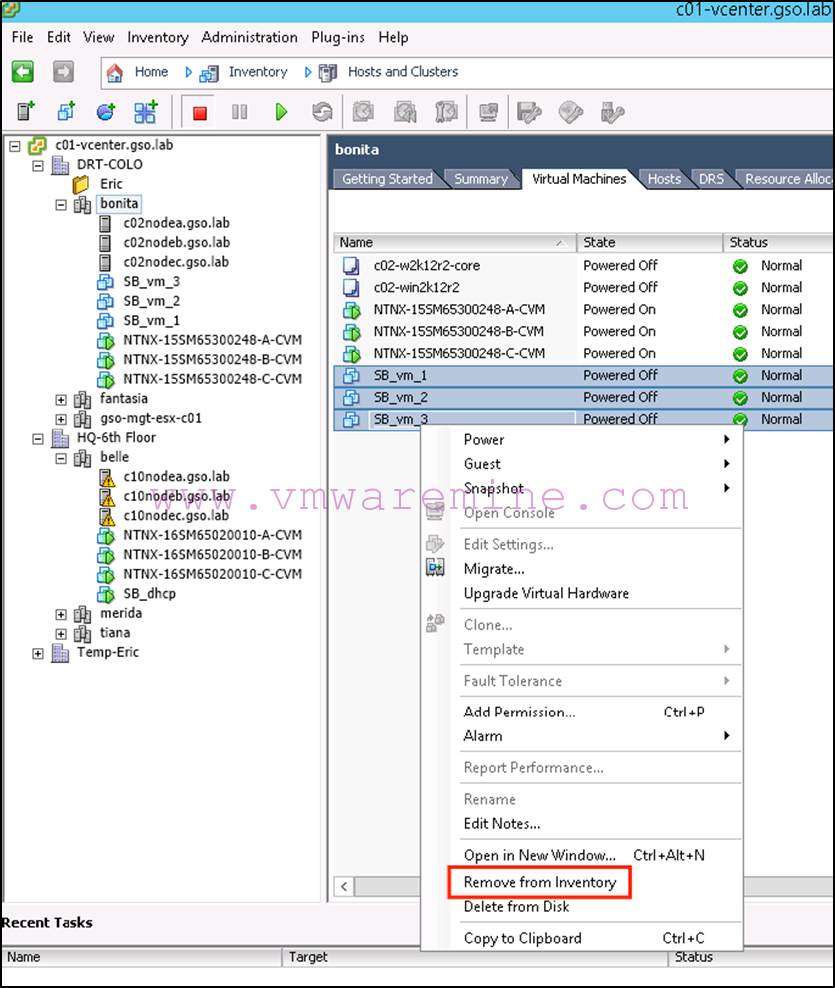
-
Next we register the VMs in vCenter on Belle (the target). To facilitate this, we use the following PowerCLI command:
Connect-viserver c01-vcenter.gso.lab
$esxhost = get-vmhost c10nodea.gso.lab
dir ‘vmstores:\c01-vcenter@443\HQ-6th Floor\c02-ct1\*\*.vmx’ | where {$_.Name -match “SB_vm_”} | % {New-VM -VMHost $esxhost -VMFilePath $_.DatastoreFullPath}
Note that:
- The first line connects us to the vCenter server.
- We then grab one of the hosts in our target compute cluster (which one doesn’t really matter since we’re only registering VMs at this stage. When we power them on, DRS will distribute them automatically).
- We then list all vmx files in the protected container/datastore and register it against our host. Note that the “where” statement in the middle can be used to filter for only specific VM names (I have other stuff in this container in my lab which I did not want to include).
The results of this command can be viewed in the following screenshot:

As well as in vCenter:
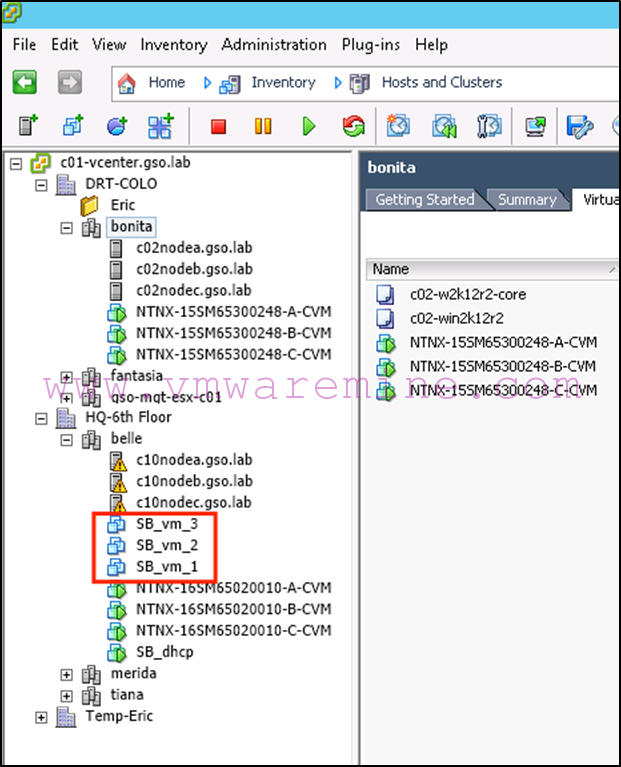
If we needed to remap the virtual interfaces, we could use something like what was mentioned in the Async DR failover (see above).
-
Now we can power on our virtual machines:
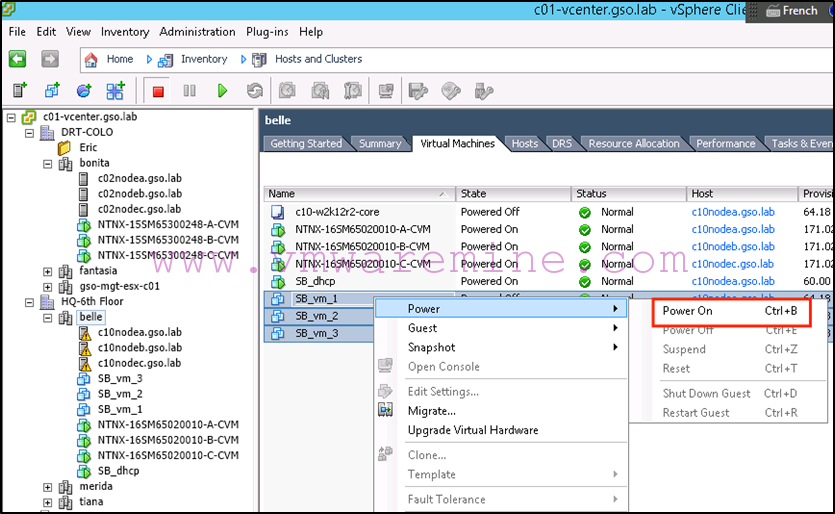
Now for the failback:
-
We shut down the VMs on Belle (the target):
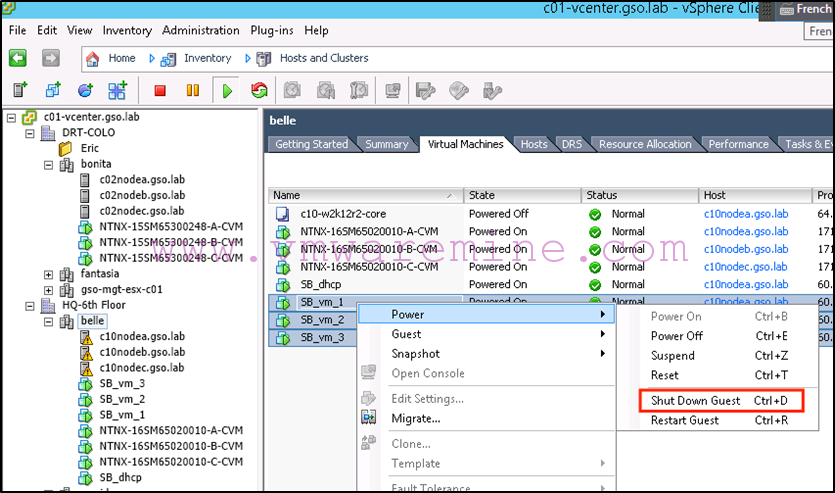
-
Next we disable replication on the protection domain from Belle (the target):


-
Next we promote the protection domain on Bonita (the source):


-
Next we re-enable replication on the protection domain on Bonita (the source):

As during the failover, you’ll want to make sure that everything is back to normal:

-
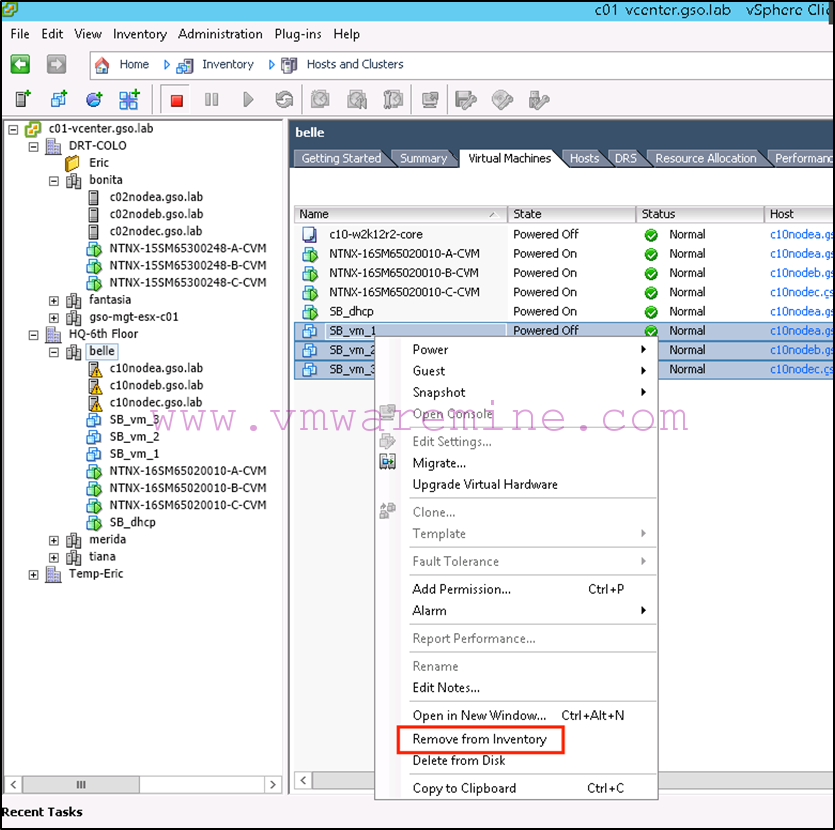
Next we remove the VMs from vCenter inventory on Belle (the target):
-
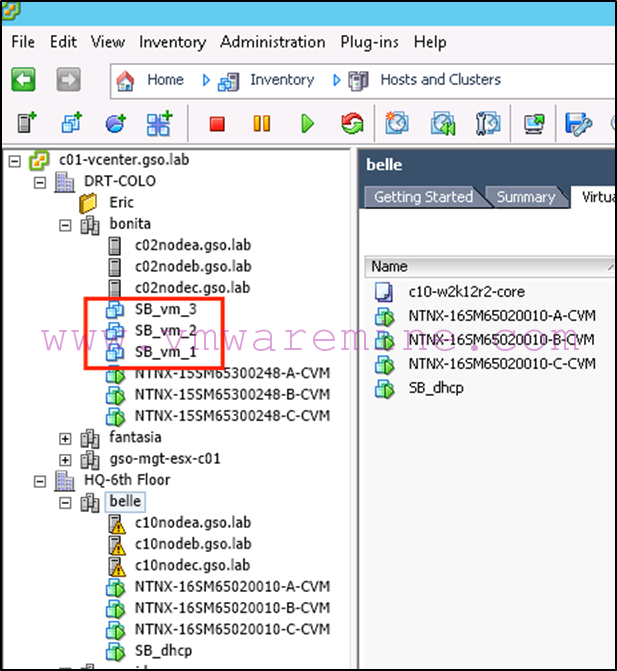
Next we register the VMs in vCenter on Bonita (the source):

-
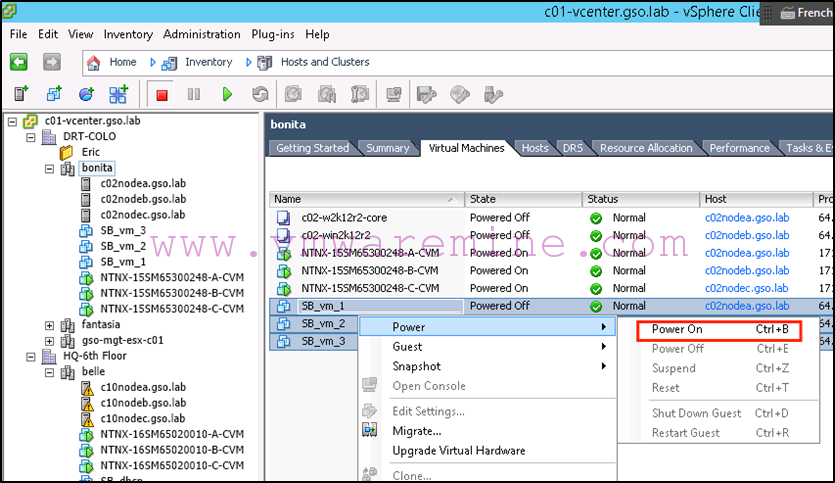
Now we can power on our virtual machines (assuming we don’t need to remap vNICs):
That’s it, easy as pie!
Again, if we needed to mess about with IP addresses, we could use PowerCLI and VMware tools to do that. See Alan Renouf’s example on how this can be done.
Note that you could not use VMware Site Recovery Manager with Sync DR since SRM only works with Async DR protection domains.
In the next and final part of this series, we will look at unplanned failover and failback for Async DR, MA and Sync DR on vSphere.


Lot of manual commands , which means more chances or errors. Is there anything which has an automation built into the product by Nutanix?