With new version of Acropolis 4.6.1 there is quicker way for migrate virtual machines from Citrix XenServer platform to Nutanix Acropolis. Thanks to one of my colleagues from Nutanix, I can share procedure he tested and validated.
Requirements:
- AOS 4.6.1 or newer
- AHV 20160217.2 or newer
- Citrix XenSever 6.1 or 6.5
- mounted Nutanix container as NFS storage to Citrix XenServer
- installed Nutanix VM Mobility 1.0.1 for Windows – download it from portal.nutanix.com – make sure you have installed prior migration
Step #1: Remove all Citrix\Xen related devices.
In device manager, check in Show hidden devices and remove all devices when you can see XEN or Citrix in the name
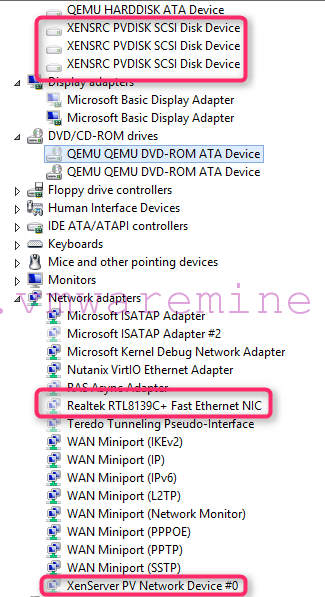
Remove XenServer hardware from VM
Step #2 – Uninstall all drivers and software which are related to Citrix and reboot virtual machine.
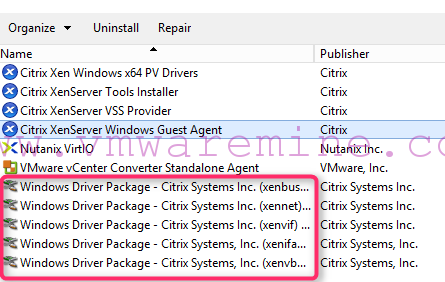
Uninstall all drivers and software
Step #3 – Move VM disks to Nutanix Acropolis
Move VM disks from legacy storage to Nutanix container. Which was mounted before as NFS datastore.
Step #4 – Shutdown VM
Step #5 – identify VM disk
Log in to XenServer over ssh and:
- run command: xe list-vm
- note down VM’s name and UUID
- run command: xe vm-disk-list uuid=<vmUUID>
- note down UUID for VDI files
[root@xenserver01 /]# xe vm-disk-list uuid=46796fa7-f31f-faa5-ae16-27414ae3b8e1
Disk 0 VBD:
uuid ( RO)             : c8d7ebcf-a958-424c-650e-64488fed6794
    vm-name-label ( RO): win2k12r2xs
       userdevice ( RW): 1

Disk 0 VDI:
uuid ( RO)             : 46b05e07-f3f2-478c-a7eb-d9a416713b51
       name-label ( RW): data01
    sr-name-label ( RO): NFS virtual disk storage
     virtual-size ( RO): 10737418240

Disk 1 VBD:
uuid ( RO)             : 6bbaca4c-dba5-296a-5d57-056be1129a03
    vm-name-label ( RO): win2k12r2xs
       userdevice ( RW): 0

Disk 1 VDI:
uuid ( RO)             : 1672ea5f-0185-4fa9-8c35-eb1aae6d865e
       name-label ( RW): win2k12r2xs 0
    sr-name-label ( RO): NFS virtual disk storage
     virtual-size ( RO): 34359738368

Disk 2 VBD:
uuid ( RO)             : 77611e99-7502-baaf-f669-4de562a8b42d
    vm-name-label ( RO): win2k12r2xs
       userdevice ( RW): 2

Disk 2 VDI:
uuid ( RO)             : fa29c3ea-be54-4839-9d60-1c571be17ce6
       name-label ( RW): data02
    sr-name-label ( RO): NFS virtual disk storage
     virtual-size ( RO): 11811160064
Step #5 – Create image
There are two ways of doing it. Command line or through Prism UI.
Command line – log in to CVM, start acli and run image.create with parameters.
<acropolis> image.create Win2k12R2XC-Cdrive source_url=nfs://127.0.0.1/transfer/c289fb7a-8f11-2299-db5c-065bad2717fb/8853ebcb-330a-4c3a-b0be-de022e88a2e6.vhd container=transfer image_type=kDiskImage wait=true
List all images.
<acropolis> image.list
Image name                  Image UUID
Win2012R2                   3b6e16f3-3057-41d7-9809-17d1ad8dd8f6
Win2k12R2XC-Cdrive          b4c6a67c-8cca-4544-ae34-1b2077eaf9ad
Win2k16TP4                  9f1d048c-010a-4cf3-8df6-f73d3247ef54
virtIO-0.1.117              f1915cc6-6d48-4008-89d0-5847d770254b
<acropolis>
Prism Element
NOTE: make sure you have
- Log in Prism Element, From right top choose – Image configuration –> Upload Image
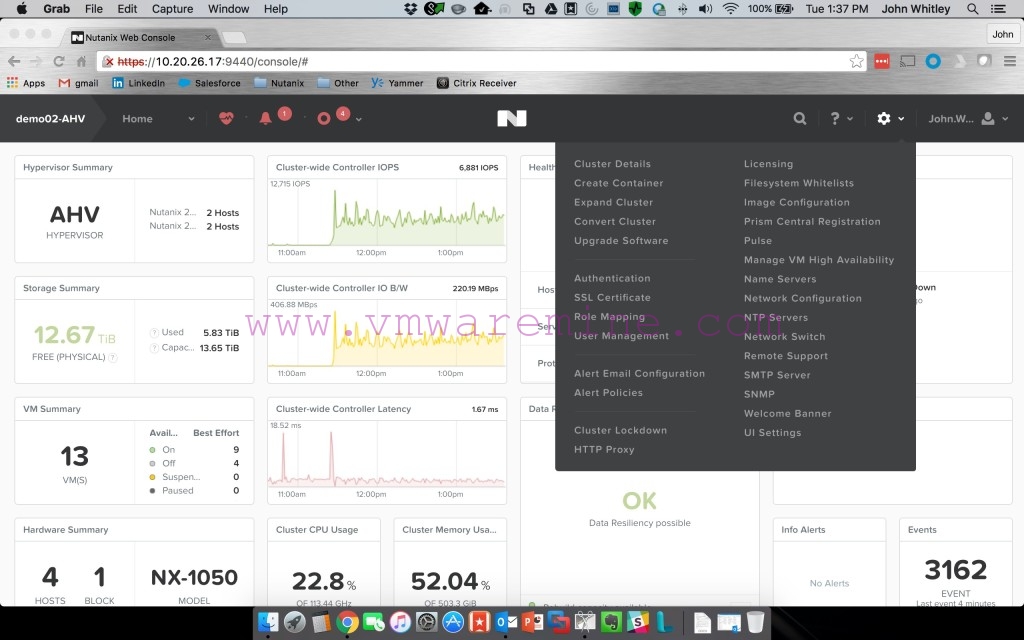
Prism Element
- Provide following:
- image name,
- annotation,
- image type – choose disk
- choose destination container
- source – select “From URL and provide path to VHD file like in below example: nfs://127.0.0.1/’container name’/’VHD file name’
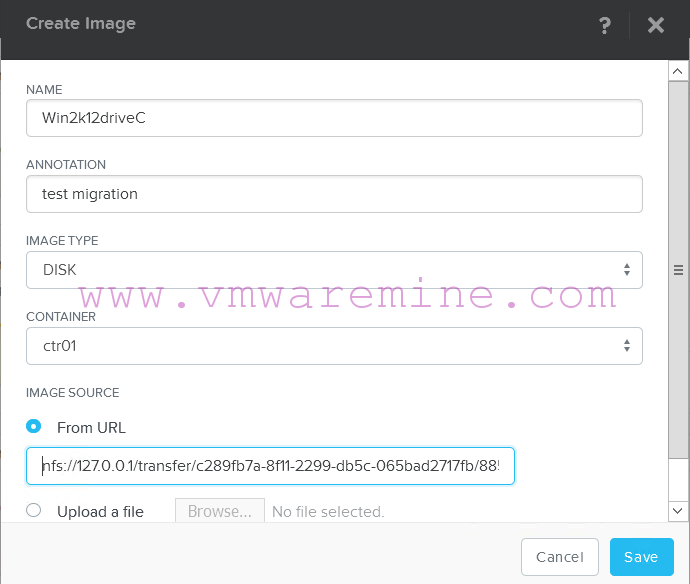
Create image from VHD disk
Step #6 – Create VM
Create new VM in Prism with following:
- VM name,
- number of vCPU
- RAM size
- add new disk:
- TYPE: DISK
- OPERATION: clone from image services
- BUS TYPE: SCSI
- IMAGE: choose image you’ve created in previous step
- SIZE: make sure disk size is equal or bigger than source disk
- do not forget about network card
- Select Save
- Power VM on.
Than would it. VM should boot up smoothly on AHV.



This is not working for me – if i move the VM while running i get a VHD chain on the destination – which is NOT good because im unable to “chain” the VHD again into Container
I need to stop the VM – copy the VM and then the progress works.. Am i missing something or do i just have to work for the SM GC Process to do a coalesce on the storage before i can do the NFS import of the VHD??