 This is part 3 of a 3-part series on Nutanix disaster recovery capabilities on the VMware vSphere virtualization platform.
In part 1, we covered the basic features of data replication in Nutanix Acropolis Base Software (formerly known as Nutanix Operating System or NOS). We explained what Async DR is and how to set it up. We also explained what Metro Availability is and how to set it up (with a bonus Powershell script to assist with some of the tedious vSphere DRS configuration tasks).
In part 2, we looked at how to do planned failovers and failbacks for Async DR and Metro Availability.
In part 3, we will now look at how to execute unplanned DR with Async DR and Metro Availability, including how to failback once your failed site has been recovered.
So this is it. Shit has hit the fan. Your primary DC has burned to the ground, and you’re left with the responsibility to bring it all back online at the recovery site. Will you succeed? Are you confident you know what to do? Can you do it alone?
With a feverish hand, you grab your mouse and start clicking away, hoping for the best…
Hopefully, you’ll never be in that situation, although from experience, when they do happen, it is usually 4:30 am after a night out.
In any case, the following procedures should help you get prepared for the worst and be able to get everybody back in business without you having to light a candle and say a prayer first.
So without further ado, let’s review our three scenarios (Async DR, MA and Sync DR).
Unplanned failover and failback for Async DR on VMware vSphere
The failover workflow is the following:
- Determine that a site failure has occurred and that a failover must occur
- On the remaining site, activate the Async DR protection domain
- Power on VMs and adjust networking if required
Once the primary site has recovered, you will need to:
- Shutdown all your protected VMs on the recovery site
- Delete all the protected VMs from the primary site (since they’ve already been recovered on the recovery site)
- Delete the protection domain on the primary site
- Re-enable replication from the recovery site
- Migrate VMs from the recovery site to the primary site
- Power on your VMs and adjust networking as required
- Remove orphaned VMs left in the vCenter inventory
- Re-enable replication from the primary site to the recovery site
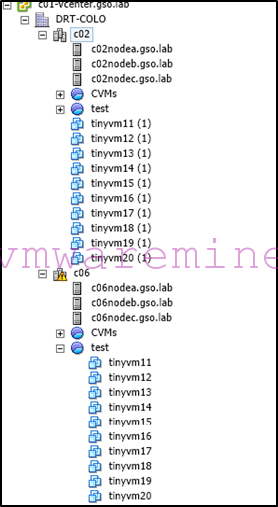
As a reminder, this is our setup in the lab where screenshots have been taken from:
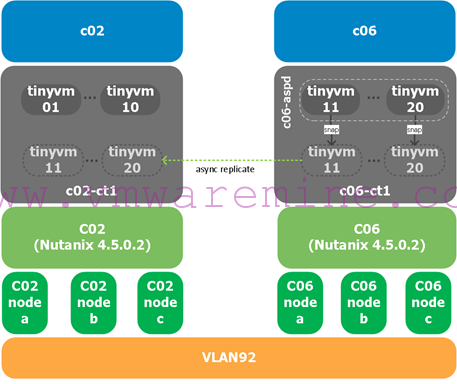
We are replicating VMs from Nutanix and vSphere cluster c06 (our source) which are in container c06-ct1 to Nutanix and vSphere cluster c02 (our target) in container c02-ct1.
Step 1: Determining a failure has occurred
As someone famous once said, “With great power comes great responsibility” (who the quote should be attributed to is apparently a matter of dispute).
Engaging a failover with an Async DR protection domain means VMs will be:
- Shutdown at the primary/source site
- Unregistered from the primary/source site
- Registered on the recovery/target site
Assuming your recovery site will require some kind of network adjustment, this means failing over can be quite a bit of work and will definitely cause a service outage for your users. Failing back also takes time, so before starting a failover, you need to be absolutely sure that your primary site is gone and that failing over to the recovery site is the right thing to do.
At the time of writing, there is unfortunately nothing in the product which can help you make that decision. This feature is planned for later. For now, you are on your own making the right call.
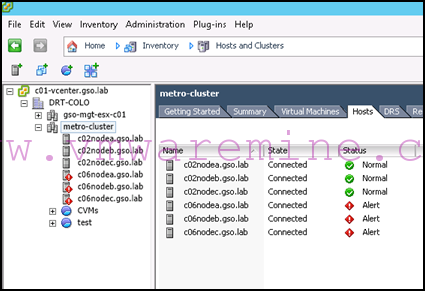
Typically, you will see something like all your hosts on the primary site being down, such as:

Once you’ve made the decision to failover to the recovery site, the rest is easy.
Step 2: Activating the protection domain at the recovery site
Connect to the Prism interface of the Nutanix cluster at the recovery site, navigate to the Data Protection screen, select your Async DR protection domain, and click Activate:
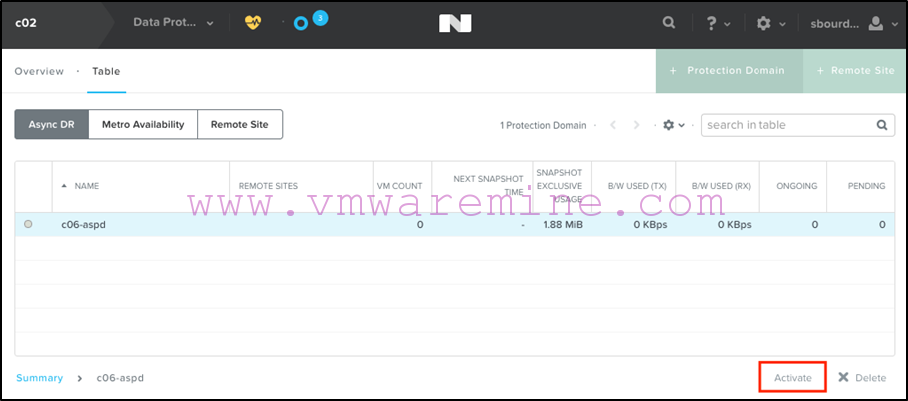
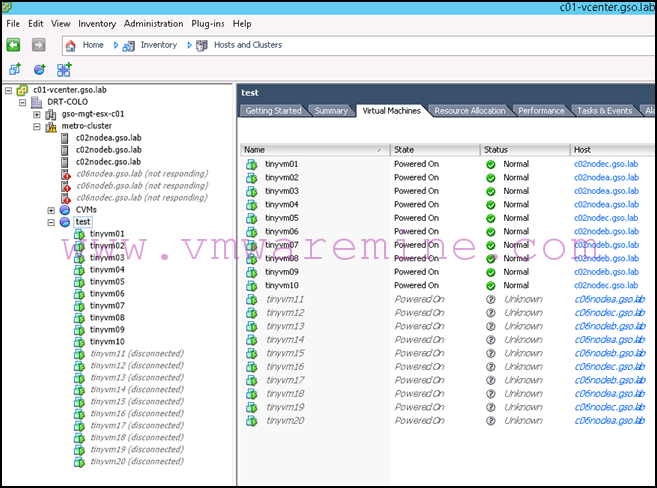
VMs which are part of that protection domain will be registered against the Cerebro master ESXi host at the recovery site. Because registration is done with an ESXi host and not vCenter (which remember, may not be available if it was hosted on the primary site), the names of the registered VMs may look funny in vCenter:
Step 3: Powering on VMs
At this stage, you may want to remap the network interfaces of your VMs if they need to be connected to a different port group. There are suggested Powershell commands you can use to do that referenced in part 2 of this blog series.
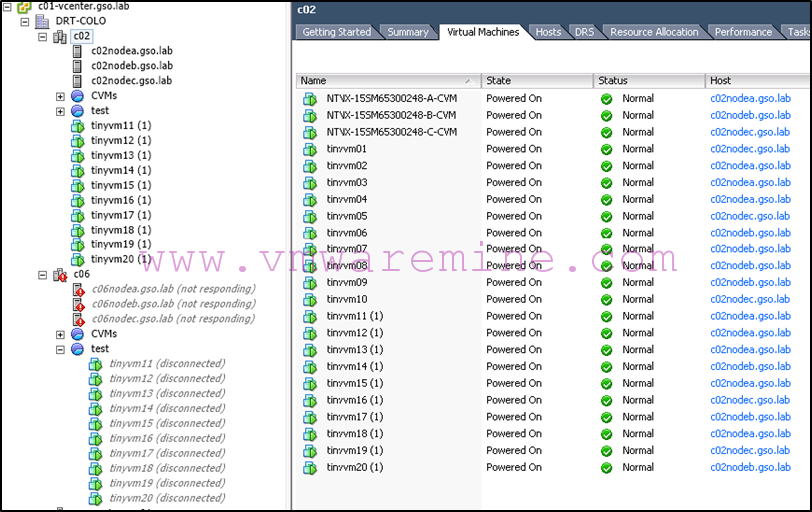
You are now ready to power on your VMs:
If your VMs need IP address changing, you will need to do that either manually or using custom scripts. Part 2 of this blog has some suggestions.
Note that of course, if you are using VMware Site Recovery Manager, the whole process will be different. I’ll try to cover that in a future blog (but given how long it’s taken me to write this series, don’t hold your breath). In the meantime, the latest SRA documentation can be accessed here.
Step 4: Failing back
So, once your primary site comes back online, what will happen? Well, since you activated the recovery protection domain while the primary site was done, this latter still thinks it owns the VMs and that they are registered against its host. Depending on how your VM start options are configured, ESXi hosts on the primary site may even try to power on the VMs which means they could potentially be online on both sites (yes, causing IP conflicts if they are on the same subnet).
For all those reasons, it’s best to power off your VMs at the recovery site before powering on your ESXi hosts at the primary site.
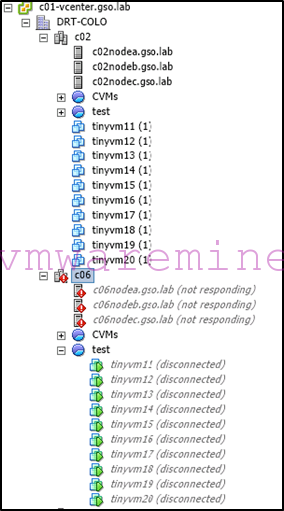
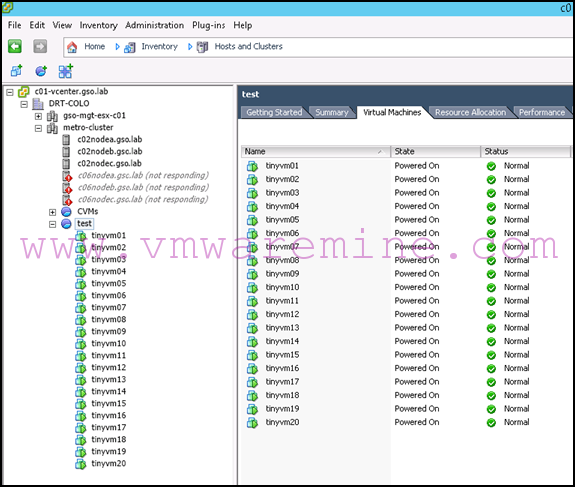
Once the ESXi hosts are powered on, things in vCenter will look something like that:
You may also see errors in Prism that the primary site is unable to replicate the protection domain to the recovery site:
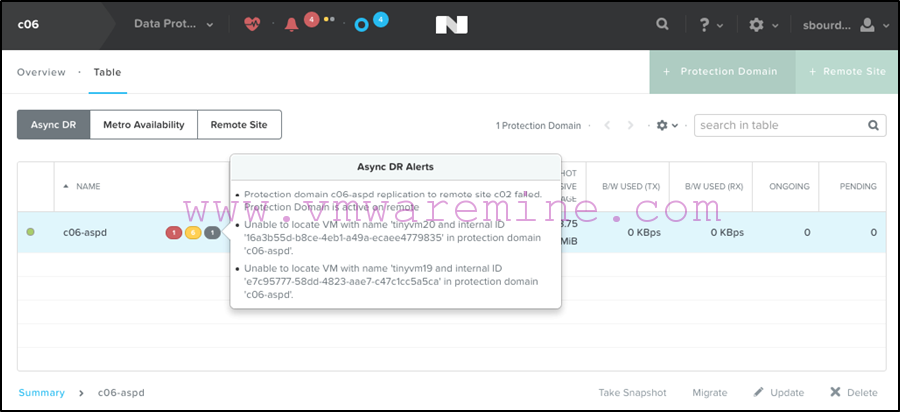
So take a deep breath and don’t panic, all of this is perfectly normal. We just need to set the primary site straight on who is now the authority for those VMs.
First things first, you can start by deleting all the “old” VMs in vCenter on the primary site. That’s right, select them all, right click and select “Delete from disk”. Since those are now live and up to date on the recovery site, we don’t need them on the primary site. Note that there is an alternative method if you’re not afraid to use the command line, but more on that later. We’ll cover the manual/UI way first.
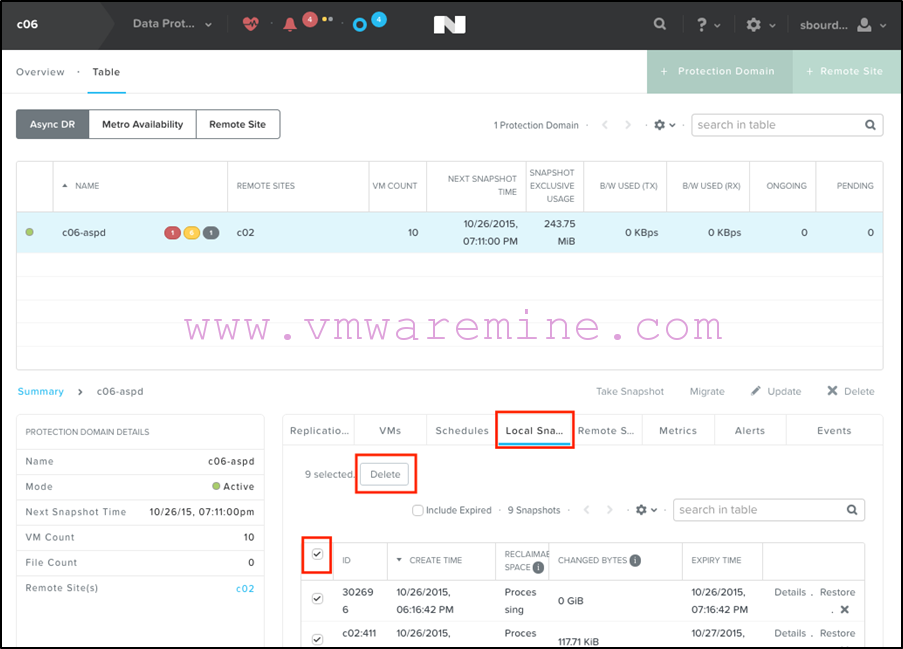
Next, you will need to clean up the protection domain on the primary site so that we can replicate from secondary to primary. That means deleting all snapshots on the PD on the primary site:
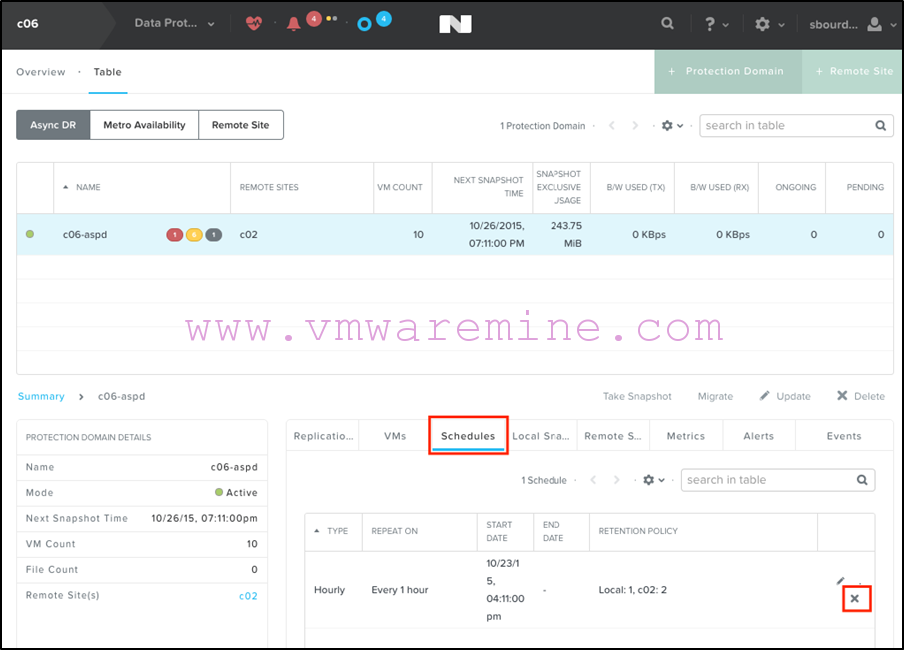
Then deleting any existing schedules on the PD on the primary site:
And finally, removing the Protection Domain itself on the primary site:
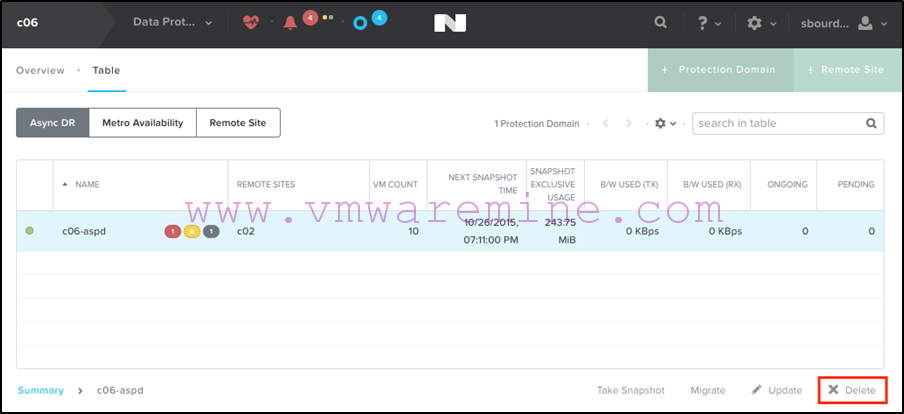
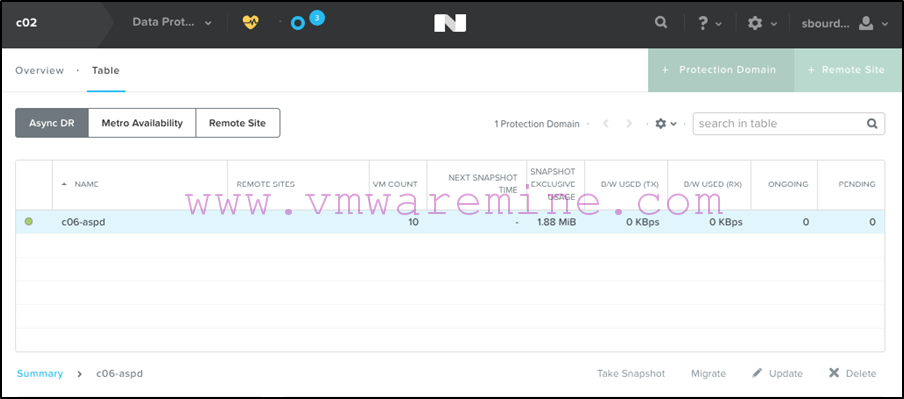
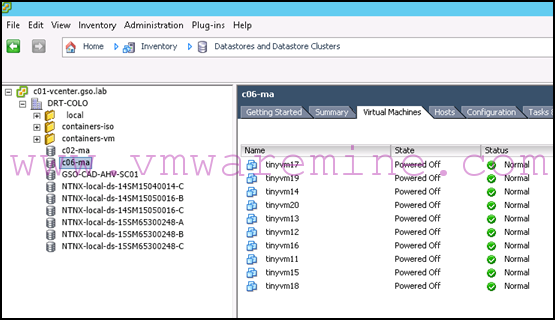
Note that the Protection Domain on the recovery site is still there, alive and kicking:
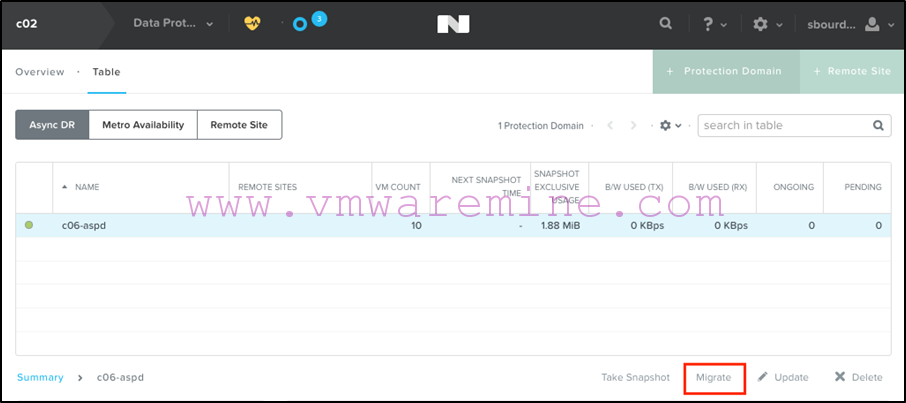
We just cleaned up the old stuff. Now in with the new. All we need to do is migrate that PD back to the primary site (which will incidentally also take care of replicating the data):
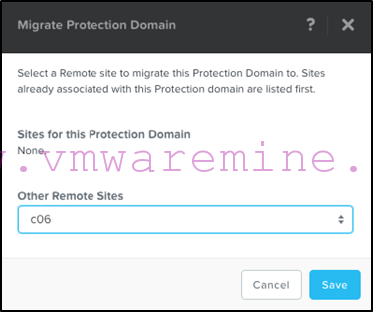
Select the primary site as your migration target:
After migration is done (which may take a while if you have a lot of data to migrate), low and behold, VMs will be unregistered on the recovery site and registered again on the primary site (yes, still with funny names because we don’t talk to SPOF vCenter):

Part 2 of this blog has sample Powershell commands you can use to remove orphaned objects and rename the newly registered VMs to get rid of the ” (1)”.
You may now need to remap your network interfaces and you will then be ready to power on your VMs.
Are we done? No Sir. What about our replication schedule? Yes, VMs are active back on the primary site, but are they being replicated to the recovery site? Nope. You will need to recreate the replication schedule manually, as was originally done in part 1 of this blog series when we set this all up.
Note that, as mentioned earlier, there is an alternative method which uses the command line for failing back to the primary site. Before we detail it, I want to give credit to Nutanix Services Senior Consultant Rob Schricker for documenting and testing this in the lab. So here it goes:
-
Once the primary cluster is back online, run this command on any primary CVM:
ncli pd deactivate_and_destroy_vms name=”Insert PD Name here”
This should have set the primary to “Inactive” on the PD
- Make sure that the VM’s at the primary site are not powered on (They should be orphaned)
- Manually create a snapshot of the recovery site VM’s via the PD – replicate the snapshot to the primary site by clicking the check box.
- On the primary site, check Prism and verify that the incoming replication was successful (Prism -> Home -> Data Protection -> Async DR -> Replications)
- Shutdown the affected VMs at the recovery site after the snapshot has been completed.
-
Click the “Migrate” action to return the VMs to the primary site. If the “Migrate” action is greyed out, log out and log back in to Prism. If the “Migrate” action is still greyed out, manually migrate the Protection Domain from DR site to Primary with following command:
ncli pd migrate name=”Name of PD” remote-site=”Name of Remote Site on DR”
- Power on your VMs at the primary site, adjust networking and clean up orphaned VMs records in the vCenter inventory at the recovery site. You’re done!
Note that with this procedure, the replication schedule (from primary to recovery site) should still be there and therefore, you won’t need to recreate it.
Unplanned failover and failback for Metro Availability on VMware vSphere
The workflow is the following:
- Determine that a site failure has occurred and that failover must occur
- On the remaining site, manually disable replication on active MA protection domains if your VM Availability policy is manual
- On the remaining site, promote standby protection domain
- Confirm HA is restarting your VMs
Once you have recovered your primary site, you will need to:
- Shutdown all your protected VMs
- Disable replication on the active protection domain at the recovered primary site (it will be in decoupled status)
- Re-enable replication on the protection domain from the secondary site (so that data is replicated over to the primary site)
- Disable replication again, then promote the standby protection domain on the recovered primary site
- Re-enable replication from the recovered primary site
- Restart all your protected VMs
Now for the screenshots. As a reminder, this is our setup in the lab:
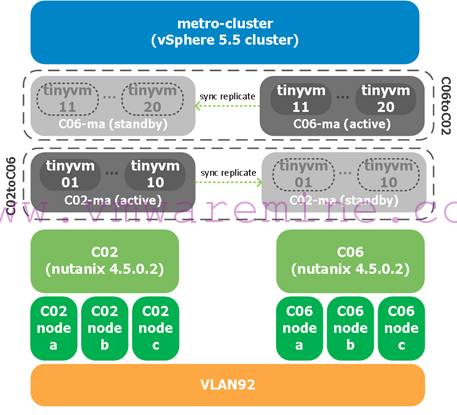
We will simulate a failure on c06 hosts by powering them off using the IPMI (Supermicro out of band management adapter). That means all VMs running in the c06-ma datastore and on c06 hosts will failover to c02 hosts. We will then perform a failback after powering on the c06 hosts again using the IPMI.
Step 1: Determining a failure has occurred
Determining a total site failure is eventually something you will have to figure out how to do in your specific environment. What we will cover here is what you see in both the vSphere client and Prism when the hosts from the other Nutanix clusters cannot be reached anymore.
The first symptom in vSphere will be your hosts going on alert in the client:
Eventually, they will all become disconnected:
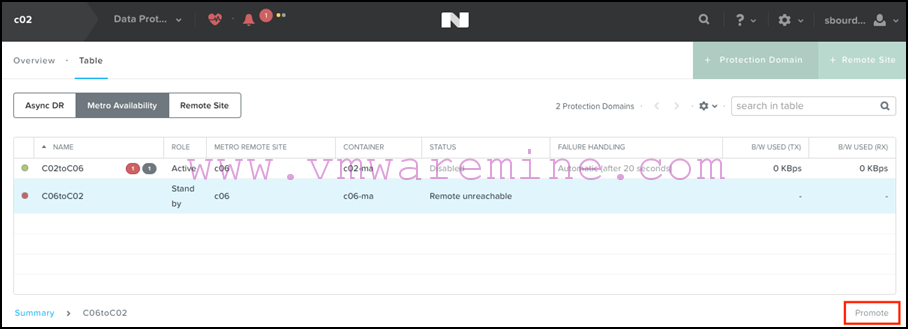
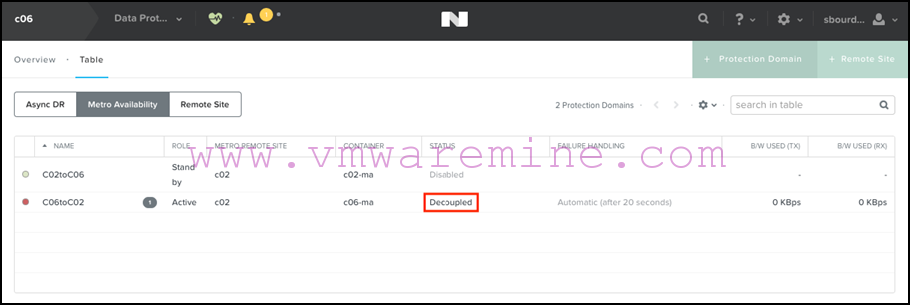
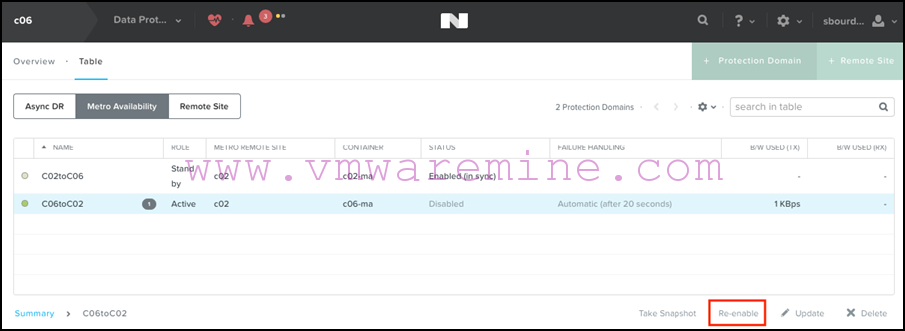
From Prism, you will immediately see that the remote site is marked unavailable on the protection domains:
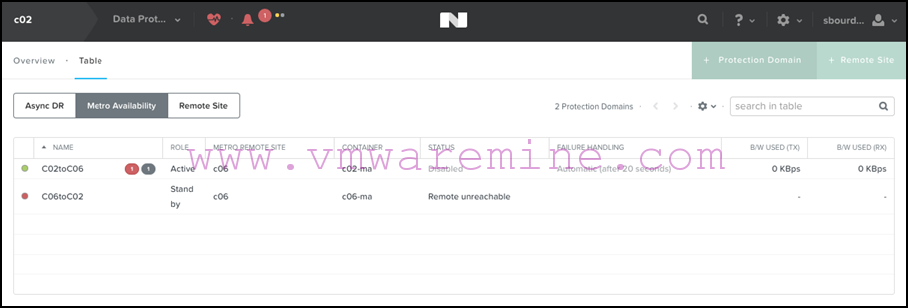
Note that in this example, the C02toC06 protection domain which was configured with an “Automatic” VM Availability / Failure Handling policy has been set to “Disabled” already, which means VM write I/Os have been resumed on the container which is no longer replicated.
At this stage, you know something is wrong, and you now need to decide whether you want to take action and initiate a failover.
Step 2: Taking care of protection domains on the remaining site
Assuming you decide you want to failover, here is how you do it.
- You start by disabling replication on any active protection domain you have and for which you have selected the manual VM availability policy (see part 1 of this blog for an explanation of what that means). In our example, we don’t have any, but if we did, we would simply select them and click “Disable”.
- You then select any standby protection domain you have and promote them:
- At this stage, HA should take care of the rest and restart the VMs for you.
- Note that we don’t absolutely need to change DRS affinity rules at this stage since the hosts on the other site are unavailable. That is still something I would recommend you do to make sure that DRS doesn’t try to vMotion the VMs back to the other site once the hosts become available again.
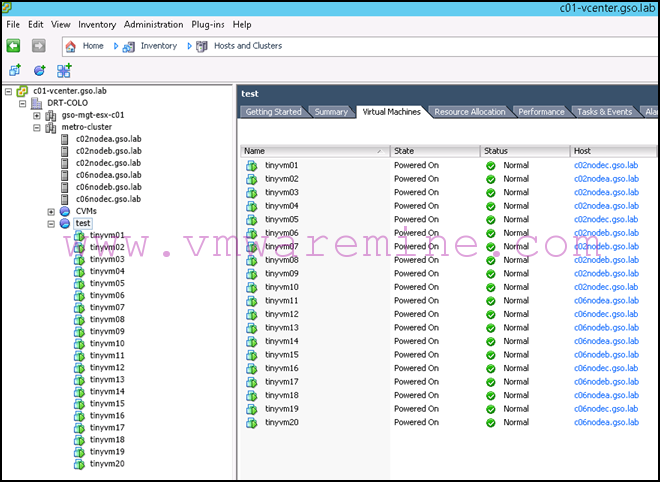
Step 3: Confirming HA has restarted all VMs
Nothing much to do here except making sure the VMs have restarted OK. Note that this can take a few minutes, but eventually, you should see all your VMs started, even though half of your hosts are unavailable. Note that it is your responsibility to make sure you have enough compute capacity on the remaining site as HA Admission Control will not prevent VMs from starting in the event of a HA failover.
Step 4: Failing back
Failing back is fairly straight forward, but you want to make sure you don’t mess up the order of the steps here or you could end up with VMs having active data on both sites and in a decoupled state which would require you to open a support ticket to sort out properly.
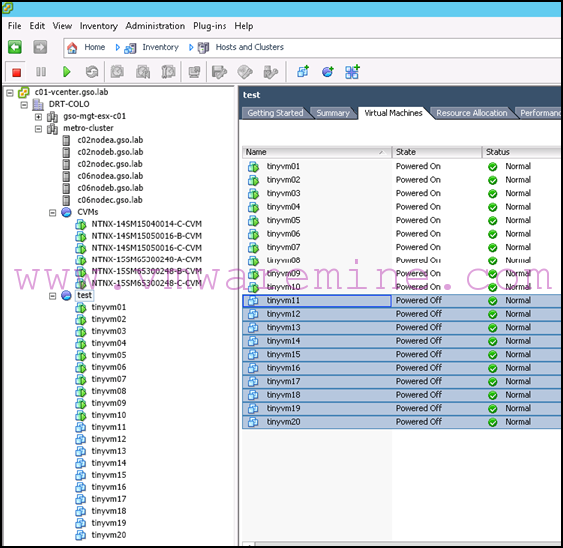
- As always, start by shutting down your VMs (unless you are using AOS 4.6 or above, in which case you can use the planned failover online migration method described in part 2 of this blog after taking care of the recovery site):
- If you changed your DRS affinity rules, you will need to change them again.
- Confirm that your hosts are back online and available by checking their status in the vSphere client:
- You may also want to make sure your Nutanix cluster status is OK in Prism or by running a cluster status command from one of the CVMs.
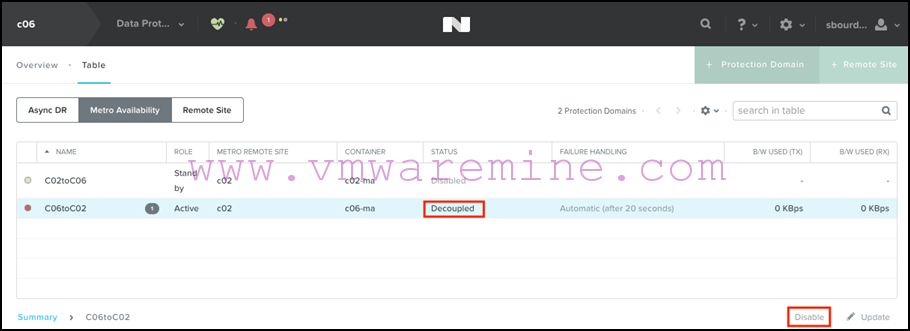
- Note that the protection domain is shown active on the primary site but in a decoupled state:
- The first thing to do is to disable replication on that decoupled PD:
- We now re-enable replication from the secondary site for all protection domains, so that any changes that have been written on the VMs when the primary site was failed are replicated to the primary site again:

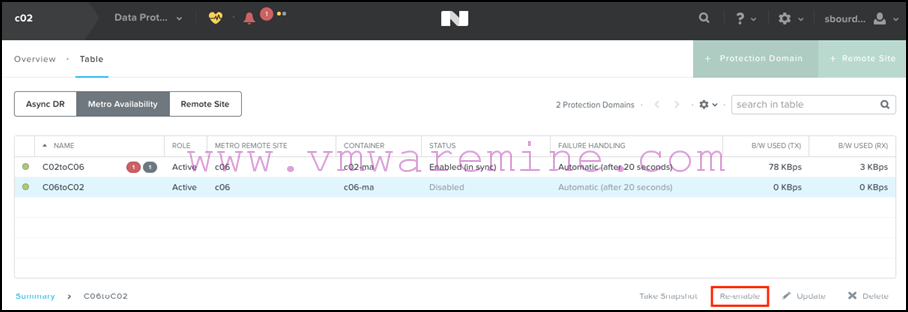
- Once the replication is done, we disable it again from the secondary site:

- We now promote the PD on the primary site:
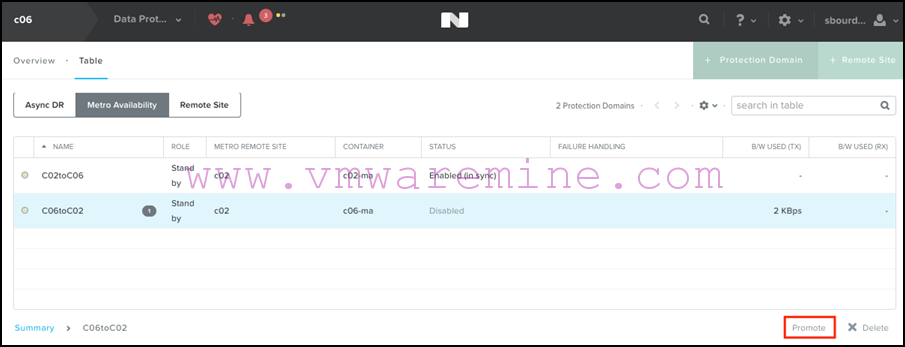
- And re-enable replication from the primary site:
Note that Prism will warn you that the container at the remote site will be over-written, which is normal:

- We are now ready to power on VMs on the primary site (remember, DRS will make sure they start on the desired hosts).
- That’s it!
Unplanned failover and failback for Sync DR on VMware vSphere
Things for Sync DR will be fairly similar to Metro Availability, with a few notable exceptions:
- Once your MA PD has been promoted at the recovery site, you will need to register VMs manually on hosts at the recovery site. That’s because you’re using different compute clusters. Powershell can be used to facilitate that process, and I will (hopefully) soon post examples on how to do just that in this article.
- Because you’re using different compute clusters, HA will not restart your VMs, so not only do you have to register them manually, but you will also have to power them on, and yes, potentially change their network configuration if you have different layer 2/3 networks.
- When failing back, you will want to unregister VMs on the recovery site, failover from secondary to primary, then register VMs on primary hosts again.
And no, sorry, no screenshots yet for that procedure. I will try my best to add them soonTM.
In conclusion: so ok, it’s not perfect (EDIT 08/09/2016: But it’s getting better. Read Josh Odgers’ blog on our upcoming witness feature for Metro Availability for automated failover). It does require some manual steps and a little planning. But think about the process from a bird’s eye view: from setting it up to getting it done, it has been fairly simple. Yes, some vendors will argue that they can deliver an end-to-end automated solution, but how many veterans will it take to set up and maintain? Can it beat a truly software defined solution? I don’t think so.
On paper they may sound good, but think about real life scenarios and remember that keeping it simple is what gets IT delivered at the end of the day. There are always a few gotchas, in any solution, so don’t just drink the kool aid, but try it out for yourself.
As an added bonus, here are detailed instructions targeted at operational teams on how to failover and failback (planned and unplanned) using Metro Availability on vSphere in PDF format (note that they both assume AOS 4.6 or above):


Thanks Stephane for this great post, I’ve print it and keep in my “emergency paper folder”!. I’ve tested the metro failover/back in production environment last weekend (first day of company summer holidays) by unplug all network cables from one block. Not all working good (two esxi hosts was unresponsive after failback and I’ve force rebooted togheter with CVM’s also!), but the great Nutanix support help me very good and everything’s come back to work without problem.