NOTE: NUTANIX Xtract was renames to Nutanix MOVE
Back in December 2018 Nutanix released Xtract in version 2.0. Major enhancements are support for Amazon AWS EC2 VM migrations and redesign tools architecture.
Amazon AWS EC2 support
With Nutanix Xtract 2.0 you can migrate AWS EC2 instances to Nutanix AHV. Below GuesOS are fully supported by extract.
- Windows Server 2012 R2, 2016
- RHEL 7.3 to 7.5
- CentOS 7.3 to 7.5
- Ubuntu 14.04, 16.04, and 18.04
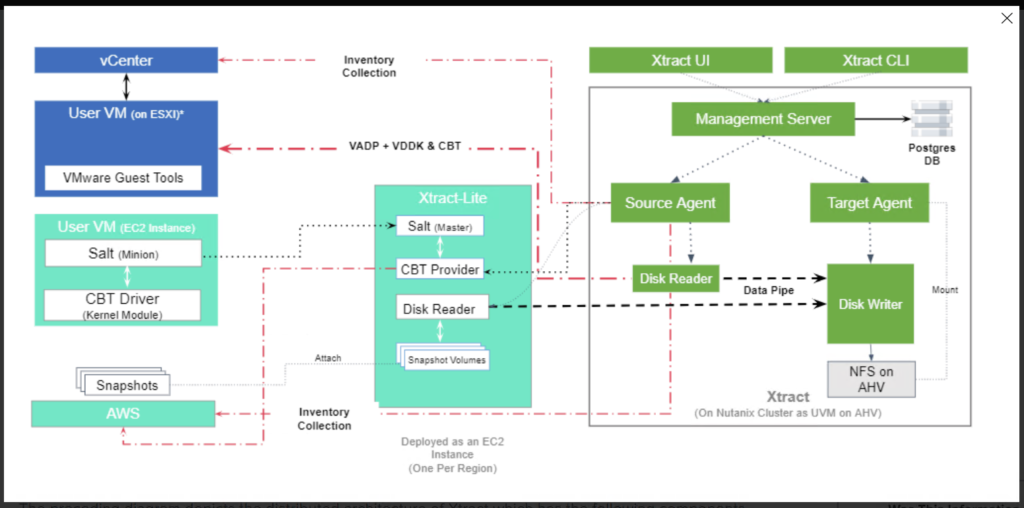
Xtract new architecture
In

- Xtract-Main: a VM running on the Nutanix cluster to orchestrate the migration.
- Xtract-Lite: an agent running on AWS as
a EC2 instance of type t2.micro. Xtract-Lite interfaces with source VM to facilitate the migration. It works with AWS APIs to take snapshots and transfers data from source to target. - CBT Driver: a driver running on the source VMs to be migrated to facilitate efficient transfer of data from the source to the target
Deploy Nutanix Xtract 2.0
Deployment process for Nutanix Xtract 2.0 is very similar to previous version. The only difference is you cannot assign static IP address during VM build, you have to configure it manually after VM boots up.
First, connect to Nutanix cluster from command line
PS C:\xtract-vm-2.0.2-release> .\cli-windows-amd64-2.0.2.exe -c <Nutanix cluster IP address>Next, run command deploy-VM with parameters:
deploy-vm vm-container <storage _container_name> vm-network <port_group_name>Below you can read through the process
$ » deploy-vm  vm-container GSO-HQ1-MGMT vm-network  VLAN_174
Image is already present as a local file ./xtract-vm-2.0.2.qcow2, nothing to download...
Image Download complete... [OK]
Creating image...
Uploading file ./xtract-vm-2.0.2.qcow2
[============================================================================================] 100.00% 3m18s Total time
VM Deployment completed [OK]
VM Power on completed [OK]
VM 'Xtract for VMs' got IP address: 10.1.175.108 [OK]
'Xtract for VMs' Services started up [OK]
Opening url https://10.1.175.108/ in your browser...
Connected to cluster gso-hq1-mgmt(10.1.174.52)
Current cluster 10.1.174.52 added successfully as a target with name 'gso-hq1-mgmt' [OK]
Deployed the Xtract for VMs application Virtual Machine... [OK]

$ (Xtract for VMs) »
If you do not have DHCP in the network, log in to VM (Nutanix Console) and set up IP address manually.
Now, when you have Xtract up and running, point web browser to the IP address, set new password and you can start planning your migration.
You can use Nutanix Prism to deploy Xtract too. Follow Nutanix official documentation which will walk you through the deployment process.

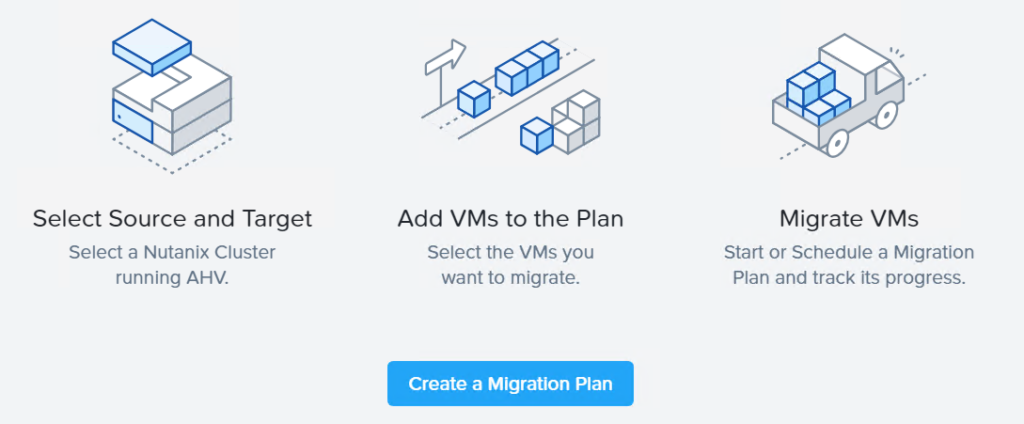
On the landing page, you can do everything from one dashboard. On left side, you can see source and target environments. By default, Nutanix cluster where Xtract was deployed is visible as migration target.
First thing what you have to do it add source environment. You can choose either you point to VMware vSphere vCenter, ESXi or Amazon Web Services. See below video to watch the process.


