Upgrading Nutanix clusters with one-click upgrade when you do not have direct Internet connectivity is easy with Dark Site solution. But what if you have large, geographically distributed environment often connected via not the fastest links on the planet? Then you can set up local systems that will sync content and expose them via HTTP and your clusters will pull content locally with no harm to WAN link bandwidth. With DFS-R you can control replication speed during business hours so your business users will be kept happy. Here is scripted process so you do not have to click to much
Setting up DarkSite host
Assumptions:
- Content is stored on E drive,
- PS script has two modes – one for source server on which files will be updated (read-write location) and remote location where locations will be set to read-only,
- save PS script and run from elevated PS session,
- tested on WS2019,
- DFS-R replication schedule is set according to MS documentation for 16Mbps between 7PM-7AM and 1Mbps 7AM-7PM local time of receiving member
Powershell script to configure IIS and DFS-R:
param
 (
  [string][ValidateSet("root_lcm", "lcm")]$srvtype
 )

function set_acl {
 param (
  [string]$identity,
  [string][ValidateSet("ReadAndExecute", "Modify", "FullControl")]$rights,
  [string][ValidateSet("ContainerInherit, ObjectInherit", "None")]$inheritance,
  [string][ValidateSet("None", "NoPropagateInherit", "InheritOnly")]$propagation,
  [string][ValidateSet("Allow", "Deny")]$type,
  [string]$path
 )

 $inheritance = "ContainerInherit, ObjectInherit"
 $propagation = "None"
 $type = "Allow"

 $ace = New-Object  System.Security.AccessControl.FileSystemAccessRule($identity,$rights,$inheritance,$propagation,$type)

 $acl = Get-Acl -Path $path
 $acl.AddAccessRule($ace)
 Set-Acl -path $path -AclObject $acl
}

switch ($srvtype)
 {
  root_lcm {
   #install IIS and DFS if not already installed
   if (!(Get-WindowsFeature Web-Server).Installed) {Install-WindowsFeature -name Web-Server -IncludeManagementTools}
   if (!(Get-WindowsFeature FS-DFS-Replication).Installed) {Install-WindowsFeature -name FS-DFS-Replication}

   #create folders
   New-Item -Path e:\ -Name NutanixLCM -ItemType Directory
   set_acl -identity 'IUSR' -rights "ReadAndExecute" -inheritance "ContainerInherit, ObjectInherit" -propagation "None" -type "Allow" -path "E:\NutanixLCM"
   set_acl -identity 'IIS_IUSRS' -rights "ReadAndExecute" -inheritance "ContainerInherit, ObjectInherit" -propagation "None" -type "Allow" -path "E:\NutanixLCM"

   #Set IIS config
   Import-Module -Name WebAdministration

   Set-WebConfigurationProperty -pspath 'MACHINE/WEBROOT/APPHOST' -location 'Default Web Site' -filter "system.webServer/security/authentication/anonymousAuthentication" -name "enabled" -value "True"
   Set-WebConfigurationProperty -pspath 'MACHINE/WEBROOT/APPHOST' -location 'Default Web Site' -filter "system.webServer/security/authentication/windowsAuthentication" -name "enabled" -value "False"

   New-WebVirtualDirectory -Site 'Default Web Site' -Name NutanixLCM -PhysicalPath E:\NutanixLCM\

   #Create web.config file with all mimeType details and dump it to virtual directory
   $webconfig = '<?xml version="1.0" encoding="UTF-8"?>
<configuration>
<system.webServer>
<directoryBrowse enabled="true" />
<security>
<requestFiltering>
<fileExtensions>
<add fileExtension=".sign" allowed="true" />
<add fileExtension=".json" allowed="true" />
<add fileExtension=".iso" allowed="true" />
<add fileExtension=".xz" allowed="true" />
<add fileExtension=".BD" allowed="true" />
<add fileExtension=".bin" allowed="true" />
<add fileExtension=".csv" allowed="true" />
<add fileExtension=".exe" allowed="true" />
<add fileExtension=".frm" allowed="true" />
<add fileExtension=".lod" allowed="true" />
<add fileExtension=".md" allowed="true" />
<add fileExtension=".std" allowed="true" />
<add fileExtension=".tgz" allowed="true" />
<add fileExtension=".tar" allowed="true" />
<add fileExtension=".vib" allowed="true" />
<add fileExtension=".txt" allowed="true" />
<add fileExtension=".zip" allowed="true" />
</fileExtensions>
</requestFiltering>
</security>
<staticContent>
<clear />
<mimeMap fileExtension=".sign" mimeType="plain/text" />
<mimeMap fileExtension=".json" mimeType="plain/text" />
<mimeMap fileExtension=".iso" mimeType="plain/text" />
<mimeMap fileExtension=".xz" mimeType="plain/text" />
<mimeMap fileExtension=".BD" mimeType="papplication/x-iso9660-image" />
<mimeMap fileExtension=".bin" mimeType="papplication/x-iso9660-image" />
<mimeMap fileExtension=".csv" mimeType="papplication/x-iso9660-image" />
<mimeMap fileExtension=".exe" mimeType="papplication/x-iso9660-image" />
<mimeMap fileExtension=".frm" mimeType="papplication/x-iso9660-image" />
<mimeMap fileExtension=".lod" mimeType="papplication/x-iso9660-image" />
<mimeMap fileExtension=".md" mimeType="papplication/x-iso9660-image" />
<mimeMap fileExtension=".std" mimeType="papplication/x-iso9660-image" />
<mimeMap fileExtension=".tgz" mimeType="papplication/x-iso9660-image" />
<mimeMap fileExtension=".tar" mimeType="papplication/x-iso9660-image" />
<mimeMap fileExtension=".vib" mimeType="papplication/x-iso9660-image" />
<mimeMap fileExtension=".gz" mimeType="papplication/x-iso9660-image" />
<mimeMap fileExtension=".txt" mimeType="plain/text" />
<mimeMap fileExtension=".zip" mimeType="application/zip" />
</staticContent>
</system.webServer>
</configuration>'
   $webconfig | Out-File E:\NutanixLCM\web.config

   #Create DFS replication group if not exist
   if (!(Get-DfsReplicationGroup -GroupName NutanixLCM)){
   New-DfsReplicationGroup -GroupName "NutanixLCM" | New-DfsReplicatedFolder -FolderName "NutanixLCM" | Add-DfsrMember -ComputerName "$env:computername"
   Set-DfsrMembership -GroupName "NutanixLCM" -FolderName "NutanixLCM" -ContentPath "E:\NutanixLCM" -ComputerName "$env:computername" -PrimaryMember $True -StagingPathQuotaInMB 16384 -Force
   Set-DfsrGroupSchedule -GroupName "NutanixLCM" -Day Monday,Tuesday,Wednesday,Thursday,Friday,Saturday,Sunday -BandwidthDetail AAAAAAAAAAAAAAAAAAAAAAAAAAAA66666666666666666666666666666666666666666666AAAAAAAAAAAAAAAAAAAAAAAA
   }

  }

  lcm {
   #install IIS and DFS if not already installed
   if (!(Get-WindowsFeature Web-Server).Installed) {Install-WindowsFeature -name Web-Server -IncludeManagementTools}
   if (!(Get-WindowsFeature FS-DFS-Replication).Installed) {Install-WindowsFeature -name FS-DFS-Replication}

   #create folders - NTFS permissions and data will be properly created with DFS-Replication
   New-Item -Path E:\ -Name NutanixLCM -ItemType Directory

   #Set IIS config

   Import-Module -Name WebAdministration

   Set-WebConfigurationProperty -pspath 'MACHINE/WEBROOT/APPHOST' -location 'Default Web Site' -filter "system.webServer/security/authentication/anonymousAuthentication" -name "enabled" -value "True"
   Set-WebConfigurationProperty -pspath 'MACHINE/WEBROOT/APPHOST' -location 'Default Web Site' -filter "system.webServer/security/authentication/windowsAuthentication" -name "enabled" -value "False"

   New-WebVirtualDirectory -Site 'Default Web Site' -Name NutanixLCM -PhysicalPath E:\NutanixLCM

   #DFS config
   Add-DfsrMember -GroupName "NutanixLCM" -ComputerName "$env:computername"
   Add-DfsrConnection -GroupName "NutanixLCM" -SourceComputerName "put your source server name here" -DestinationComputerName "$env:computername"
   Set-DfsrMembership -GroupName "NutanixLCM" -FolderName "NutanixLCM" -ContentPath "E:\NutanixLCM" -ComputerName "$env:computername" -StagingPathQuotaInMB 16384 -Force -ReadOnly $true

   }
}
Populating content on your source LCM server
Then you can download and do the same with NCC, AOS, Foundation, Foundation Platforms, AHV and other Nutanix products that support LCM based updates. This includes firmware also – they are available for download by platform at LCM download links.
Give your DFS-R replication a while for replication to kick in and sync content around the globe.
Remediating Clusters with LCM
Configure PE to use DarkSite for LCM repository – point to local based DarkSite repo
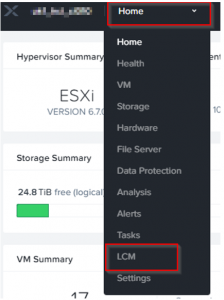
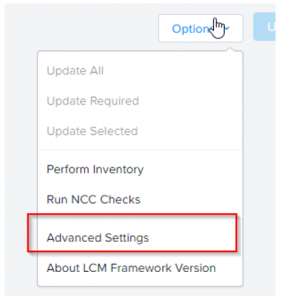
Clusters may have older version of LCM engine – then it will look a bit different at initial configuration. To set it up choose LCM from main menu and then in Options choose Advanced Settings and provide your nearest Dark Site url. After that perform Inventory to update LCM engine on the cluster:

For newer LCM engine on the cluster UI looks a bit different and you can find Dark Site under Settings in Update Source:

Once you set your update source run Inventory:

This process may take a while especially if LCM engine needs to be updated. LCM engine on PC and PE needs to be in the same version so make sure you keep them in sync. If they are in sync but you see warnings – make sure to clear browser cache.
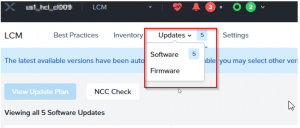
With inventory process finished you may proceed with software update via LCM. Choose Updates -> Software:
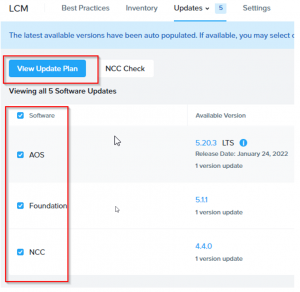
Select updates you want to perform and view update plan
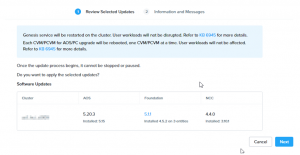
Make sure your PC supports AOS version to which you’re upgrading (this really should be done before you populate your production Dark Site source – you can check it on Nutanix Portal):

Some components will only update once previous update is done. Perfect example is Foundation Platforms which require specific Foundation version. So it may be required that after initial update Inventory is needed to discover potential updates that are still required – please make sure to always perform inventory after successful update.

End result should be fully patched cluster with all modules matching software modules that you have on your Dark Site source.


