In the past several posts I did cover migration scenarios from VMware vSphere, Microsoft Hyper-V, or Citrix XenServer. In upcoming weeks I will be posting how to migrate from KVM-based hypervisors like Redhat Hypervisor (RHV) or opensource KVM running on Ubuntu or CentOS. In this post, you can learn how to migrate Windows from KVM to Nutanix AHV
Requirements:
- AOS 5.10 or newer – I have tested on AOS 5.16.X
- Install Nutanix virtIO drivers on source VM prior to the migration. I have used VirtIO drivers in version 1.1.5. You can download Nutanix VirtIO drivers from Downloads –> Tools (opens in a new tab)”>my.nutanix.com –> Downloads –> Tools
- Guest virtual machine – CentOS 8.1
- Ubuntu 18.04 KVM
You can watch YouTube video or read this post 🙂
Mount Nutanix container on Linux KVM host. Detailed information on how to do it you can find in one of my previous posts – Mount Nutanix container on KVM host
sudo mount 192.168.1.40:/SelfServiceContainer /mnt/nutanix/First, find out what is the VM configuration on the Linux KVM host. You can do it from a virtual machine manager or from the command line.
IMPORTANT: Shutdown source virtual machine on KVM host.
To convert VM disk from qcow2 format to raw you can use qemu-img on your KVM host or transfer disk file to AHV in qcow2 format and use Nutanix Image services. I decided to use qemu-img, see the example below.
qemu-img convert -f qcow2 -O raw win2k16kvm.qcow2 win2k16kvm.rawroot@artur-nuc:/var/lib/libvirt/images# ll
total 41965452
drwx--x--x 2 root root 4096 Mar 24 22:07 ./
drwxr-xr-x 7 root root 4096 Mar 23 23:57 ../
-rw------- 1 root root 21478375424 Mar 23 23:19 CentOS81.qcow2
-rw------- 1 root root 21478375424 Mar 23 23:56 VPN-WG.qcow2
-rw------- 1 root root 42956488704 Mar 24 22:05 win2k16kvm.qcow2
-rw-r--r-- 1 root root 42949672960 Mar 24 22:07 win2k16kvm.raw
root@artur-nuc:/var/lib/libvirt/images#Copy VM disk file from KVM host to Nutanix AHV container. You can use the standard cp command on Linux but cp the command does not show progress. It is better to use rsync -ah --progress . YOu can create an alias in the system to replace standard cp with rsync.
root@artur-nuc:~# alias cp="rsync -ah --progress"
root@artur-nuc:~# cp /var/lib/libvirt/images/win2k160kvm.raw /mnt/nutanix/
sending incremental file list
win2k16kvm.raw
         12.65G  94%   15.77MB/s    0:00:47
When copy and check are done, the VM file is on the Nutanix cluster. Now, the rest of the migration process can be done from Prism.
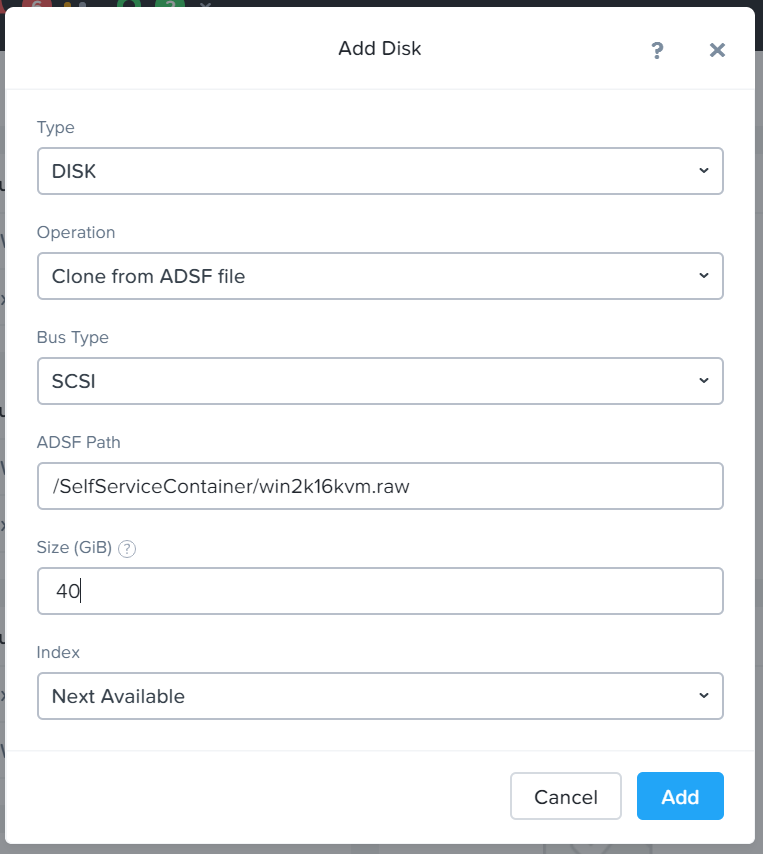
First, create a new VM. When adding a new disk, choose SCSI disk and Clone from ADFS. In the ADSF path, provide the path to the raw file. Start typing / and system will automatically give you “hints”.
Add a network adapter into the VM configuration. Power VM on. That’s it. Log in to VM, check disk layout, networking, and application.

